
In this article, readers will discover crucial golf cart brake tuning techniques designed to enhance safety and performance. We will explore essential golf cart braking system calibration methods that ensure your vehicle operates smoothly. Detailed guidance on golf cart brake modification procedures will help you achieve optimal functionality, making your rides both safer and more enjoyable.
Understanding the Importance of Golf Cart Brake Adjustment
Ensuring that your golf cart's brakes are properly adjusted is crucial for both safety and performance. When brakes are not functioning optimally, it can lead to dangerous situations on the course or while driving in other environments.
Why Brake Adjustment Matters
The significance of regular golf cart brake adjustment lies in several key areas:
- Safety: Well-adjusted brakes prevent accidents by ensuring that the cart can stop effectively, especially on slopes or uneven terrain.
- Performance: Properly adjusted brakes enhance the overall driving experience, providing smooth and reliable stopping power.
- Longevity: Regular brake maintenance, including adjustment, can extend the lifespan of your brake components, saving you money on replacements.
Indicators of Brake Issues
Recognizing when your golf cart needs brake adjustment is essential. Look out for these signs:
- Increased stopping distance: If your cart takes longer to stop, it’s time to check the brakes.
- Uneven wear: Inspect the brake pads for uneven wear, which may indicate misalignment.
- Noisy brakes: Squeaking or grinding sounds can signal that the brakes need immediate attention.
Steps for Proper Brake Adjustment
To maintain optimal performance, follow these essential steps for golf cart brake adjustment:
- Inspect brake components regularly for wear and tear.
- Adjust the brake cables to ensure proper tension.
- Align brake pads correctly to avoid uneven wear.
- Test the brakes after adjustments to confirm effective operation.
By prioritizing the adjustment of your golf cart brakes, you not only enhance your safety but also ensure a smoother ride. Regular checks and adjustments can significantly improve the functionality of your golf cart, making your time on the course more enjoyable.
Essential Tools Needed for Golf Cart Brake Adjustment
When it comes to ensuring your golf cart operates smoothly, proper brake adjustment is vital. To perform this task effectively, you’ll need the right set of tools. Here’s a comprehensive list of the essential tools required for golf cart brake adjustment, ensuring you can achieve optimal performance.
Basic Hand Tools
To begin, gather these fundamental hand tools that are necessary for accessing and adjusting the brake components:
- Socket Wrench Set: A variety of socket sizes will help you easily remove and tighten bolts.
- Torque Wrench: This tool is crucial for applying the correct amount of force when reassembling brake components.
- Screwdriver Set: Both flathead and Phillips screwdrivers will be needed to handle different screws on the brake system.
- Adjustable Wrench: Useful for loosening or tightening various nuts and bolts that may not fit standard sizes.
Specialized Tools
In addition to basic hand tools, certain specialized tools can enhance the efficiency of your brake adjustment process:
- Brake Adjustment Tool: This tool is specifically designed to fine-tune the brake cable tension, ensuring optimal braking performance.
- Brake Cleaner: A must-have for cleaning brake components and removing debris or grease that can affect braking efficiency.
- Brake Pad Thickness Gauge: Use this tool to measure the wear on your brake pads, ensuring they are within acceptable limits for safe operation.
Safety Equipment
Safety should always be a priority when working on your golf cart. Equip yourself with the following safety gear:
- Safety Glasses: Protect your eyes from dust and debris while you work.
- Gloves: Wear durable gloves to keep your hands safe and clean from sharp edges and chemicals.
- Steel-Toed Boots: These provide added protection against heavy tools and components.
Additional Accessories
To facilitate a smoother adjustment process, consider these additional accessories:
- Shop Manual: A service manual specific to your golf cart model can provide valuable insights and specifications for brake adjustment.
- Work Light: Adequate lighting is essential for seeing the intricate details of the brake system, especially in low-light conditions.
Having the right tools is crucial for effectively performing golf cart brake adjustments. With these essential tools at your disposal, you can ensure your golf cart maintains its optimal performance on the course.
Step-by-Step Guide to Adjusting Golf Cart Brakes
Adjusting your golf cart brakes is crucial for maintaining safety and performance on the course. Whether you're experiencing issues with responsiveness or noise, following a systematic approach can ensure your brakes are functioning optimally. This guide provides a detailed walkthrough to help you make necessary adjustments with confidence.
Gather Your Tools
Before starting the adjustment process, assemble the following tools:
- Wrench Set: A set of wrenches will help you loosen and tighten brake components.
- Screwdriver: A flathead or Phillips screwdriver may be needed for various adjustments.
- Brake Cleaner: Use this to clean brake parts effectively.
- Measuring Tape: For precise adjustments, especially with brake cables.
- Jack and Jack Stands: To safely lift the golf cart for easier access to the brakes.
Step 1: Safety First
Before you begin adjusting the brakes, ensure the golf cart is on a flat surface and the key is removed from the ignition. Engage the parking brake to prevent any movement during the process.
Step 2: Lift the Golf Cart
Using the jack, lift the rear or front of the golf cart, depending on which brakes need adjustment. Secure the cart with jack stands to ensure stability while you work.
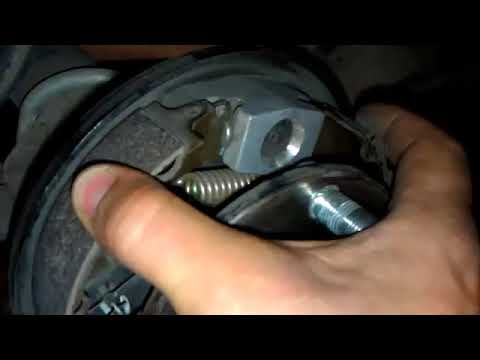
Step 3: Inspect the Brake System
Take a close look at the brake components, including:
- Brake Pads: Check for wear and tear. If they are thin, consider replacing them.
- Brake Cables: Look for fraying or stretching that may affect performance.
- Drums or Discs: Inspect for grooves or rust that could impact braking efficiency.
Step 4: Adjusting the Brake Pads
If your golf cart has adjustable brake pads, follow these steps:
1. Locate the adjustment screws on the brake assembly.
2. Use the appropriate wrench or screwdriver to turn the screws clockwise to tighten or counterclockwise to loosen.
3. Aim for a snug fit against the drum or disc without causing friction when the brake is not engaged.
Step 5: Tensioning the Brake Cables
Proper tension in the brake cables is essential for effective braking. Here’s how to adjust them:
1. Locate the cable adjustment nuts near the brake lever.
2. Turn the nuts to either increase or decrease the cable tension.
3. Test the brakes by engaging them a few times to ensure they respond quickly without excessive play.
Step 6: Clean the Brake Components
Using brake cleaner, wipe down the brake pads, drums, and other components to remove dust and debris. This will help improve braking performance and extend the life of the parts.
Step 7: Test the Brakes
Once all adjustments are made, lower the golf cart back to the ground and conduct a test.
1. Check Responsiveness: Press the brake pedal to ensure it engages smoothly and effectively.
2. Listen for Noise: While testing, listen for any unusual sounds that might indicate misalignment or wear.
3. Perform a Slow Roll Test: If safe, drive the cart at a low speed and apply the brakes to confirm they work as intended.
Adjusting your golf cart brakes can significantly enhance safety and performance. Regular maintenance, including checking and adjusting brakes, is vital for an enjoyable golfing experience.
Common Mistakes to Avoid During Golf Cart Brake Adjustment
When adjusting your golf cart brakes, it’s essential to proceed with care to ensure optimal performance. Avoiding common pitfalls can save you time, money, and enhance your safety on the course. Here are key mistakes to steer clear of during the brake adjustment process.
Neglecting to Inspect Brake Components
Before making any adjustments, it’s vital to thoroughly inspect all brake components. Failing to check for wear and tear on parts like brake pads, drums, and cables can lead to inadequate braking performance. Always ensure that:
- Brake pads are not excessively worn.
- Drums are free from cracks or warping.
- Cables are intact and properly tensioned.
Improper Adjustment Techniques
Many users make the mistake of adjusting brakes without following the correct techniques. It’s crucial to use the right tools and methods for your specific golf cart model. Here are some tips:
- Utilize a torque wrench to ensure bolts are tightened to manufacturer specifications.
- Make small adjustments gradually rather than attempting significant changes all at once.
Skipping the Test Drive
After adjustments, some users forget to take their golf cart for a test drive. This step is essential to ensure that the brakes function correctly under real conditions. Pay attention to:
- Response time when pressing the brake pedal.
- Any unusual noises, which may indicate further issues.
Ignoring Manufacturer Guidelines
Every golf cart model has specific guidelines for brake adjustments. Not adhering to these instructions can lead to improper adjustments that compromise safety. Always consult the user manual or manufacturer recommendations for:
- Brake adjustment intervals.
- Specific tools and parts required for your model.
Overlooking Brake Fluid Levels
Brake fluid plays a crucial role in the performance of your golf cart’s braking system. Failing to check and maintain the appropriate brake fluid levels can result in diminished braking capability. Ensure that:
- The brake fluid reservoir is filled to the recommended level.
- You use the correct type of brake fluid as specified by the manufacturer.
Avoiding these common mistakes during golf cart brake adjustments will enhance your vehicle's safety and performance. Taking the time to understand and implement proper procedures ensures that your golf cart remains reliable and efficient on the course.
When to Seek Professional Help for Golf Cart Brake Issues
Recognizing when to seek professional assistance for your golf cart's brake problems is crucial for ensuring both safety and functionality. If you notice any of the following signs, it may be time to consult a qualified technician.
Signs Indicating Brake System Failure
- Unresponsive Brakes: If pressing the brake pedal yields little to no response, this is a critical issue that requires immediate attention.
- Grinding or Squeaking Noises: Unusual sounds when braking can indicate worn brake pads or other mechanical failures.
- Vibrations During Braking: If the cart shakes or vibrates when you apply the brakes, this could signal an alignment problem or brake imbalance.
- Brake Fluid Leaks: Visible fluid around the brake system may suggest a leak, which can significantly impair braking performance.
Complex Repairs Beyond DIY Skills
While some basic maintenance can be handled at home, certain brake issues require specialized knowledge and tools. Consider professional help when:
- Brake Adjustment: If you’re unsure how to properly adjust the brakes, a professional can ensure the Essential Golf Cart Brake Adjustment Steps for Optimal Performance are followed accurately.
- Electrical Issues: Problems with electric brake systems often require diagnostic tools that are only available to trained technicians.
- Complete Brake Overhaul: If your brakes are completely worn out, a comprehensive replacement or overhaul is best left to the experts.
Maintaining Safety Standards
Your safety, and that of others, is paramount when operating a golf cart. If you encounter persistent brake issues despite following maintenance guidelines, or if you're unsure of the problem's severity, seeking professional help is the safest course of action. Technicians can provide thorough inspections and make necessary repairs to keep your golf cart operating smoothly.
By being proactive and addressing brake issues early, you can ensure that your golf cart remains reliable and safe for all your outings.
We would love to hear your thoughts or questions about Golf Cart Brake Adjustment Steps! Your insights and inquiries not only enrich our community but also help others who may be navigating similar challenges. Please feel free to share your experiences or seek clarification in the comments below—your voice matters, and together we can enhance our understanding of this important topic. Thank you for being a part of our conversation!
Leave a Reply