This article provides a comprehensive overview of golf cart suspension joint maintenance, focusing on essential tips and techniques for effective golf vehicle ball joint servicing. Readers will discover the importance of timely golf cart pivot joint repairs to ensure optimal performance and safety. Detailed guidance on identifying issues, performing repairs, and maintaining these critical components is also included, making it a valuable resource for golf cart owners.
Understanding the Importance of Golf Cart Ball Joint Repairs
When it comes to maintaining your golf cart's performance, ball joint repairs are often overlooked yet critical components of your vehicle's suspension system. These joints play a pivotal role in ensuring a smooth ride and enhancing overall stability. Understanding their importance can help you avoid costly repairs and improve your golf cart's lifespan.
The Role of Ball Joints in Golf Carts
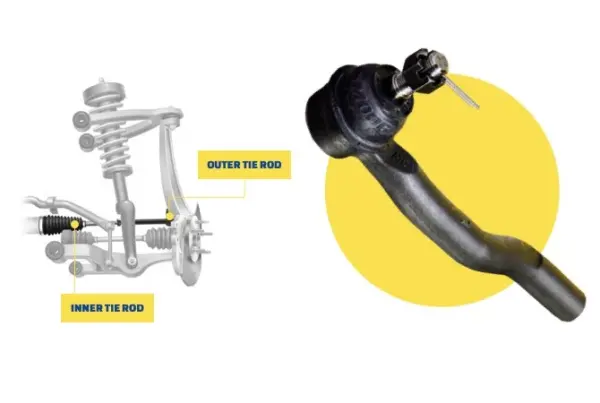
Ball joints serve as the connection between the golf cart's steering knuckles and the control arms. Their primary functions include:
- Allowing for movement: They enable the wheels to turn and adjust to uneven terrain.
- Supporting weight: Ball joints bear the weight of the cart and its passengers, maintaining proper alignment.
- Absorbing shocks: They help cushion the ride by absorbing bumps and vibrations from the ground.
Signs of Ball Joint Wear
Recognizing the signs of wear can help you take timely action. Look for:
- Unusual noises: Clunking or popping sounds when turning or driving over bumps.
- Uneven tire wear: If your tires show signs of uneven wear, it may indicate a problem with the ball joints.
- Steering issues: Difficulty in steering or a loose steering feel can signal worn joints.
Benefits of Timely Repairs
Addressing ball joint issues promptly offers several advantages:
- Improved safety: Ensures stable handling and reduces the risk of accidents.
- Enhanced performance: Restores proper alignment and handling characteristics of your golf cart.
- Cost efficiency: Prevents further damage to other components, saving money in the long run.
Choosing the Right Replacement Parts
When it comes to repairs, selecting high-quality replacement parts is crucial. Look for:
- Durability: Opt for parts that are designed to withstand the rigors of golf cart use.
- Compatibility: Ensure that the parts match your specific golf cart model for optimal performance.
- Warranty: Choose products that come with a warranty to protect your investment.
By understanding the significance of golf cart ball joint repairs, you can maintain your vehicle's functionality and ensure a safe, enjoyable ride on the course. Regular inspections and timely repairs will keep your golf cart in prime condition, making your golfing experience all the more enjoyable.
Common Signs Your Golf Cart Needs Ball Joint Repairs
Recognizing the signs that your golf cart requires ball joint repairs is crucial for maintaining optimal performance. The ball joints play a vital role in your cart's steering and suspension system, and any issues can lead to unsafe driving conditions. Here are some key indicators to watch for:
1. Unusual Noises
If you start hearing clunking or popping sounds while driving your golf cart, it may indicate that the ball joints are worn out. These noises often become more pronounced when turning or driving over bumps.
2. Steering Difficulties
A noticeable increase in steering resistance can signal that your ball joints are failing. If you find it hard to steer or if the steering feels loose, it’s time to inspect the ball joints.
3. Uneven Tire Wear
Inspect your tires regularly. If you notice uneven wear patterns, particularly on the inner or outer edges, it may be due to faulty ball joints affecting the alignment of your wheels.
4. Vibration While Driving
Excessive vibrations while driving can also be a symptom of deteriorating ball joints. This shaking can affect your comfort and control while operating the golf cart.
5. Visual Inspection
Perform a visual check of your ball joints. Look for signs of grease leakage or any visible cracks in the joint housing. If you see any damage, it’s advisable to seek repairs promptly.
6. Sagging Suspension
If your golf cart appears to be sagging or leaning to one side, it could be a sign that the ball joints are compromised. A sagging suspension not only affects aesthetics but can also impact ride quality.
7. Increased Play in the Steering Wheel
If you notice more play or looseness in the steering wheel, this could indicate that the ball joints are wearing out. This increased play can lead to decreased control over the cart.
Why Timely Repairs Matter
Addressing ball joint issues promptly can prevent further damage to your golf cart's suspension system and ensure a safer driving experience. Regular maintenance and inspections are essential to prolong the life of your golf cart and enhance its performance.
Paying attention to these common signs will help you identify when your golf cart needs ball joint repairs, allowing you to maintain its functionality and safety on the course.
Step-by-Step Guide to Performing Golf Cart Ball Joint Repairs

Repairing the ball joints on your golf cart is essential for maintaining its performance and ensuring a smooth ride. This step-by-step guide will provide you with the necessary instructions to carry out effective repairs, helping you keep your golf cart in optimal condition.
Tools and Materials Needed
Before starting the repair process, gather the following tools and materials:
- Socket Set: A variety of sockets, including 10mm and 13mm sizes.
- Wrench Set: Both open-end and box-end wrenches for better access.
- Ball Joint Separator: A tool specifically designed to remove ball joints without damaging surrounding components.
- Replacement Ball Joints: Ensure they are compatible with your golf cart model, typically priced between $30 to $70 each.
- Grease Gun: For lubricating the new ball joints after installation.
- Safety Gear: Gloves and goggles to protect yourself during repairs.
Step 1: Safety First
Before beginning any repair, make sure your golf cart is parked on a level surface and turned off. Engage the parking brake and disconnect the battery to prevent any accidental starts.
Step 2: Remove the Wheel
Using the appropriate socket, loosen the lug nuts on the wheel where you need to access the ball joint. Once loosened, lift the golf cart with a jack and securely place jack stands underneath. Remove the lug nuts and take off the wheel.
Step 3: Locate the Ball Joint
With the wheel removed, identify the ball joint assembly. This is typically located at the lower or upper part of the suspension, connecting the steering knuckle to the control arm.
Step 4: Detach the Ball Joint
Using a ball joint separator, carefully separate the ball joint from the control arm or steering knuckle. Be cautious to avoid damaging surrounding components. If necessary, remove any retaining clips or bolts holding the ball joint in place.
Step 5: Install the New Ball Joint
Position the new ball joint into the assembly, ensuring it fits snugly. Reattach any bolts or clips that secure it. Use the torque specifications from your golf cart’s manual to tighten the fasteners correctly.
Step 6: Reassemble the Wheel
Once the new ball joint is securely installed, replace the wheel back onto the hub. Hand-tighten the lug nuts before lowering the golf cart back to the ground. Once it’s on the ground, use the torque wrench to tighten the lug nuts to the manufacturer’s specifications.
Step 7: Lubricate the New Ball Joint
After installation, use a grease gun to lubricate the new ball joint. This step is crucial for optimal performance and longevity. Ensure you apply the correct type of grease recommended for your golf cart model.
Step 8: Test Drive
Finally, reconnect the battery and take your golf cart for a short test drive. Listen for any unusual noises and check the steering for responsiveness. If everything feels right, your golf cart is ready for action!
Following this essential guide to golf cart ball joint repairs will help you maintain your vehicle’s performance and extend its lifespan. Regular inspections and timely repairs are key to ensuring your golf cart remains in top shape.
Choosing the Right Tools for Golf Cart Ball Joint Repairs

When it comes to maintaining your golf cart, ensuring that the ball joints are in optimal condition is crucial for a smooth ride. Selecting the right tools for golf cart ball joint repairs can make the process more efficient and effective. Here’s a guide to help you choose the best tools for this essential maintenance task.
Essential Tools for Ball Joint Replacement
To successfully perform ball joint repairs, consider acquiring the following tools:
- Ball Joint Separator: This tool is specifically designed to detach the ball joint from the steering knuckle without causing damage. Look for models that are durable and easy to use, such as the OTC 6297 Ball Joint Separator, priced around $25.
- Socket Set: A comprehensive socket set, including both metric and SAE sizes, is vital for loosening and tightening the various bolts and nuts involved. Brands like Craftsman offer quality sets starting at approximately $50.
- Torque Wrench: Accurate torque application is essential for ensuring that ball joints are secured properly. A reliable torque wrench, such as the TEKTON 24335, is available for about $30.
- Pry Bar: A pry bar can help in maneuvering components during the repair process. A 24-inch pry bar from Neiko typically costs around $15.
Optional Tools for Enhanced Efficiency
While the above tools are essential, you may also consider these optional tools to streamline your repair work:
- Impact Wrench: For quicker loosening of stubborn bolts, an impact wrench can save you a significant amount of time. A cordless model like the DEWALT DCF899P1 is priced at approximately $200.
- Ball Joint Press: This tool can make the installation of new ball joints much easier and is especially useful for those who frequently work on golf carts. The Orion Motor Tech Ball Joint Press Set is available for about $70.
Safety Equipment
Always prioritize safety when performing repairs. Consider investing in the following safety gear:
- Safety Glasses: Protect your eyes from debris and potential hazards.
- Gloves: Heavy-duty gloves can safeguard your hands from cuts and abrasions.
Factors to Consider When Selecting Tools
When choosing tools for your golf cart ball joint repairs, keep the following factors in mind:
- Quality: Invest in reputable brands known for durability to avoid frequent replacements.
- Compatibility: Ensure the tools you select are compatible with your specific golf cart model.
- Budget: Determine a budget that allows for quality tools without overspending.
By equipping yourself with the right tools, you can ensure that your golf cart's ball joint repairs are conducted efficiently and effectively, contributing to the overall performance and longevity of your vehicle.
Cost Factors to Consider for Golf Cart Ball Joint Repairs
When it comes to maintaining your golf cart, understanding the cost factors involved in ball joint repairs is essential for optimal performance. Several elements can influence the overall expense of these repairs, and being aware of them can help you budget effectively.
1. Type of Ball Joint
The cost of ball joint repairs can vary significantly based on the type of joint your golf cart requires. There are typically two types:
- OEM (Original Equipment Manufacturer) Parts: These are genuine parts made by the manufacturer, usually more expensive but ensure compatibility and reliability.
- Aftermarket Parts: These parts can be more affordable, but quality may vary. It’s crucial to research the brand and read reviews to ensure you’re getting a reliable product.
2. Labor Costs
Labor costs can also affect the total price of ball joint repairs. Factors that contribute to labor expenses include:
- Mechanic’s Experience: More experienced mechanics may charge higher rates, but their expertise can lead to better service.
- Geographical Location: Labor rates can vary widely depending on your location. Urban areas may have higher costs compared to rural settings.
3. Condition of the Golf Cart
The overall condition of your golf cart plays a role in repair costs. If other components are worn or damaged, it may require additional repairs. Consider the following:
- Age of the Cart: Older models may need more extensive repairs, impacting the cost.
- Previous Maintenance: Regular maintenance can reduce the likelihood of major repairs, while neglect can lead to compounded issues.
4. Additional Components
Sometimes, ball joint issues are not isolated. If your golf cart has related problems, such as worn-out control arms or bushings, you may incur additional costs. Always ask your mechanic to perform a thorough inspection to identify any other necessary repairs.

5. DIY vs. Professional Repairs
Choosing between DIY repairs and professional services can greatly affect costs. While DIY repairs can save money, they require a certain level of skill and the right tools. Evaluate the following:
- Skill Level: If you're comfortable working on your golf cart, DIY may be a viable option.
- Tools Required: Factor in the cost of tools if you need to purchase them for the repair.
Understanding these cost factors will not only help you plan for golf cart ball joint repairs but also ensure that your cart remains in optimal condition, enhancing your overall golfing experience.
We truly value your insights and experiences, so we invite you to share your thoughts or questions about Golf Cart Ball Joint Repairs in the comments below. Whether you have tips to offer, challenges you’ve faced, or simply want to learn more, your contributions can help foster a supportive community of golf cart enthusiasts. We’re excited to hear from you and look forward to engaging in meaningful discussions together!
Leave a Reply