This article offers a detailed Golf Cart Brake Adjustment Guide aimed at enhancing your cart's performance. You will discover essential techniques and tips for fine-tuning your braking system, ensuring safety and efficiency. With a focus on optimal functionality, this comprehensive resource serves as a valuable golf cart braking system optimization manual, providing insights that cater to both beginners and experienced enthusiasts alike.
- Understanding the Importance of Proper Golf Cart Brake Adjustment
- Step-by-Step Process for Adjusting Golf Cart Brakes
- Common Signs That Your Golf Cart Brakes Need Adjustment
- Tools and Equipment Required for Golf Cart Brake Adjustment
- Maintenance Tips to Ensure Long-lasting Golf Cart Brake Performance
Understanding the Importance of Proper Golf Cart Brake Adjustment

When it comes to ensuring a safe and enjoyable golfing experience, proper golf cart brake adjustment is paramount. Many golfers may overlook this critical aspect, but understanding its significance can greatly enhance safety and performance on the course.
The Role of Brakes in Golf Cart Safety
Brakes are one of the most vital components of any golf cart. Properly adjusted brakes can prevent accidents and ensure that the cart stops efficiently when needed. Key points to consider include:
- Preventing Rollaways: A well-adjusted brake system minimizes the risk of the cart rolling away on inclines.
- Enhanced Stopping Power: Adequate brake adjustment allows for better responsiveness, especially in emergency situations.
- Driver Confidence: Knowing that your brakes are functioning correctly boosts your confidence while navigating the course.
Signs of Improper Brake Adjustment
Recognizing the signs of improperly adjusted brakes can help you address issues before they lead to serious problems. Watch for:
- Unresponsive Brakes: If the brakes feel soft or do not engage properly, it’s time for an adjustment.
- Uneven Stopping: If the cart pulls to one side when braking, this indicates a misalignment.
- Strange Noises: Grinding or squeaking sounds can signal worn-out brake components needing immediate attention.
Benefits of Regular Brake Maintenance
Routine maintenance and adjustments can prolong the lifespan of your golf cart's braking system. Consider the following benefits:
- Cost Efficiency: Preventative measures can save you money on costly repairs down the line.
- Improved Performance: Regular adjustments ensure optimal performance, providing a smoother ride.
- Increased Safety: Consistent maintenance reduces the risk of brake failure, enhancing overall safety on the course.
How to Adjust Your Golf Cart Brakes
If you're comfortable with basic maintenance, adjusting your golf cart brakes can be a straightforward process. Follow these steps:
1. Check the Brake Pads: Inspect for wear and replace them if necessary.
2. Adjust the Tension: Use the appropriate tools to adjust the brake cable tension to ensure proper engagement.
3. Test the Brakes: After making adjustments, test the brakes in a safe area to ensure they respond correctly.
By understanding the importance of proper golf cart brake adjustment, you can enhance your safety and enjoyment on the golf course. Regular checks and maintenance not only improve your cart’s performance but also ensure that you can focus on your game without worry.
Step-by-Step Process for Adjusting Golf Cart Brakes

Adjusting the brakes on your golf cart is essential for ensuring safety and optimal performance. Follow this comprehensive golf cart brake adjustment guide to maintain your cart's braking system effectively.
Tools and Materials Needed
Before you begin, gather the following tools and materials:
- Wrench set
- Screwdriver
- Brake cleaner
- Lubricant
- Replacement brake pads (if necessary)
Step 1: Safety First
Ensure the golf cart is on a flat surface and turn off the engine. Engage the parking brake and remove the key from the ignition to prevent accidental movement during the adjustment process.
Step 2: Inspect the Brake System
Begin by examining the brake components for wear and damage. Look for:
- Worn brake pads
- Leaking brake fluid
- Corroded or damaged cables
Replace any damaged parts to ensure optimal braking performance.
Step 3: Adjusting the Brake Pads
If the brake pads are worn but not excessively, you can adjust them:
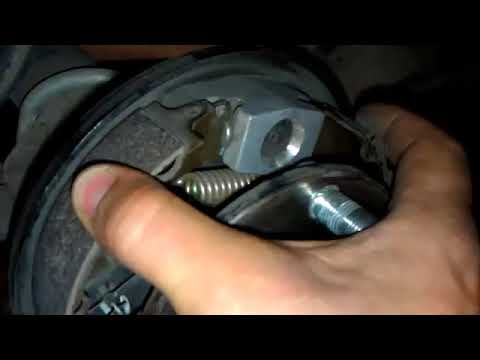
Locating the Adjustment Mechanism
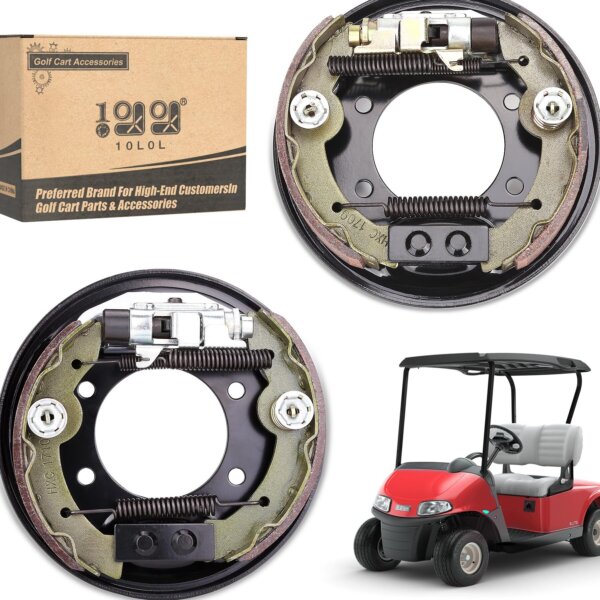
Find the adjustment nuts on the brake assembly, usually located near the rear wheels.
Making the Adjustments
Use a wrench to turn the adjustment nuts clockwise to tighten the brake pads against the drum. Ensure the pads are close enough to make contact without dragging when the brake is released.
Step 4: Testing the Brakes
Once adjustments are made, it's time to test the brakes:
- Start the golf cart and drive slowly in a safe area.
- Apply the brakes gently to ensure they engage smoothly.
- Check for any unusual noises or signs of dragging.
If the brakes feel unresponsive or make noise, further adjustments may be necessary.
Step 5: Final Inspection
After testing, conduct a final inspection of the brake system. Look for any leaks, loose components, or abnormal wear. If everything appears in order, apply a light coat of lubricant to moving parts to prevent corrosion.
By following this step-by-step process for adjusting golf cart brakes, you can ensure that your golf cart remains safe and performs at its best. Regular maintenance and adjustments are key to prolonging the life of your braking system.
Common Signs That Your Golf Cart Brakes Need Adjustment

Recognizing when your golf cart brakes require adjustment is crucial for ensuring your safety and maintaining optimal performance. Here are some distinct signs that indicate it may be time for a brake check:
1. Unresponsive Braking
If you find that pressing the brake pedal does not produce the expected stopping power, this is a clear indication that the brakes need attention. An unresponsive brake can lead to dangerous situations, especially on inclines.
2. Grinding or Squeaking Noises
Hearing unusual sounds, such as grinding or squeaking when applying the brakes, often suggests that the brake pads are worn or misaligned. This noise not only indicates a need for adjustment but can also lead to further damage if not addressed promptly.
3. Increased Stopping Distance
If you notice that your golf cart takes longer to come to a complete stop, it’s a sign that the brakes may not be functioning correctly. This can be particularly concerning when navigating busy areas or steep hills.
4. Brake Pedal Travel
Pay attention to how far the brake pedal sinks when pressed. If it feels unusually soft or goes down further than usual, this could indicate that the brake system requires adjustment or that the brake fluid levels are low.
5. Pulling to One Side
When braking, if your golf cart pulls to one side instead of stopping straight, it could suggest uneven wear on the brake pads or issues with the brake system itself. This can lead to reduced control over the vehicle.
6. Vibration or Pulsation
Experiencing vibrations or pulsations in the brake pedal can signal warped brake components or issues with the brake drum or rotor. This symptom not only affects performance but can also compromise safety.
7. Warning Lights
If your golf cart is equipped with a dashboard that includes warning lights, any indicators related to the braking system should not be ignored. These lights often provide early warnings of potential brake issues.
Maintenance Tips
To prevent brake issues, regular maintenance is key. Here are some quick tips:
- Check brake fluid levels regularly.
- Inspect brake pads for wear every few months.
- Ensure brake cables are not frayed or damaged.
- Schedule professional inspections annually.
Being proactive about these signs can help you maintain your golf cart's braking system effectively. Regular attention to these details will ensure a safe and enjoyable ride, allowing you to focus on your game rather than potential mechanical issues.
Tools and Equipment Required for Golf Cart Brake Adjustment

Adjusting the brakes on your golf cart is essential for ensuring optimal performance and safety. To effectively carry out this task, you'll need specific tools and equipment. Below is a comprehensive list of items that will aid you in performing a thorough golf cart brake adjustment.
Essential Tools
- Wrench Set: A good-quality wrench set is crucial for loosening and tightening the brake components. Look for a set that includes both metric and standard sizes, such as the TEKTON 30-Piece Wrench Set, priced around $50.
- Screwdrivers: Flathead and Phillips screwdrivers are necessary for removing any screws that may be holding the brake assembly in place. A reliable option is the Craftsman 6-Piece Screwdriver Set, available for about $20.
- Socket Set: A socket set will allow for easier access to hard-to-reach bolts and nuts. The DEWALT 10-Piece Socket Set, priced around $40, is a great choice for this purpose.
Safety Equipment
- Safety Goggles: Protecting your eyes while working on your golf cart is vital. Consider using the DEWALT DPG82-11C Safety Goggles, which retail for about $15.
- Gloves: Heavy-duty gloves can prevent cuts and scrapes. Look for a pair like the Ironclad General Utility Gloves, typically priced around $20.
Additional Equipment
- Jack and Jack Stands: Lifting your golf cart is necessary for accessing the brake components. A standard 2-ton floor jack, such as the Pro-Lift F-767 Low Profile Floor Jack, available for approximately $70, is ideal.
- Brake Fluid: Ensure you have the appropriate brake fluid for your specific golf cart model. A quart of DOT 3 Brake Fluid can cost around $10.
- Brake Cleaner: A can of brake cleaner is essential for cleaning components before reassembly. A popular choice is the CRC Brake Cleaner, which usually costs about $8.
Optional Tools
- Torque Wrench: For precise tightening of bolts, a torque wrench is recommended. The TEKTON 24335 1/2 Inch Drive Click Torque Wrench, priced at about $40, is a reliable option.
- Caliper Tool: If your golf cart has disc brakes, a caliper tool can make adjustments easier. The OEMTOOLS 25311 Disc Brake Caliper Tool, available for around $25, is a practical addition to your toolkit.
Equipping yourself with the right tools and equipment is vital for a successful golf cart brake adjustment. By having these items on hand, you can ensure that your adjustments are performed efficiently and effectively, leading to improved safety and performance on the course.
Maintenance Tips to Ensure Long-lasting Golf Cart Brake Performance

To maintain optimal braking efficiency in your golf cart, regular maintenance is crucial. By following these essential tips, you can ensure that your golf cart brakes perform reliably and last longer, enhancing your overall golfing experience.
Regular Inspection
Conduct routine inspections of your golf cart’s brake system. Look for signs of wear, such as:
- Squeaking or Grinding Noises: These sounds may indicate worn brake pads or shoes.
- Soft Brake Pedal: A spongy feeling when pressing the brake could suggest air in the brake lines or fluid leaks.
- Uneven Wear: Check for uneven wear on brake components, which may require adjustment.
Brake Fluid Maintenance
Maintaining the correct level and quality of brake fluid is vital for effective braking performance. Follow these steps:
- Check Fluid Levels: Ensure the brake fluid reservoir is filled to the recommended level.
- Replace Old Fluid: Brake fluid should be changed every 1-2 years to prevent moisture contamination.
- Use Quality Fluid: Opt for a high-quality brake fluid compatible with your cart’s system.
Brake Pad and Shoe Care
Keeping your brake pads and shoes in good condition is essential for effective stopping power. Consider the following:
- Monitor Thickness: Regularly check the thickness of brake pads and replace them when they reach the minimum thickness.
- Clean Brake Components: Dust and debris can accumulate on brake parts. Clean them periodically to ensure smooth operation.
- Proper Alignment: Ensure that brake pads are properly aligned with the brake drum or rotor to avoid uneven wear.
Adjustment Procedures
Regular adjustments are necessary to maintain optimal brake performance. Follow these guidelines:
- Check Cable Tension: Ensure that the brake cables are taut but not overly tight, allowing for proper engagement.
- Adjust Brake Shoes: For drum brakes, adjust the shoes to maintain the correct distance from the drum.
- Inspect Brake Hardware: Regularly check springs and other hardware for signs of wear and replace them as needed.
Professional Servicing
While DIY maintenance is beneficial, consider scheduling professional servicing at least once a year. A qualified technician can provide:
- Comprehensive Inspections: Thorough checks of all brake components to ensure safety.
- Expert Adjustments: Professional adjustments for optimal brake performance.
- Replacement of Worn Parts: Timely replacement of any worn or damaged components to maintain efficiency.
By implementing these maintenance tips, you can enhance the longevity and reliability of your golf cart's brake system. Consistent care not only improves performance but also ensures a safer ride on the golf course.
We value your thoughts and insights! If you have any opinions, questions, or personal experiences related to the Golf Cart Brake Adjustment Guide, we warmly invite you to share them in the comments below. Your contributions not only enrich our community but also help others who may be navigating similar concerns. Let’s foster a supportive dialogue together!
Leave a Reply