
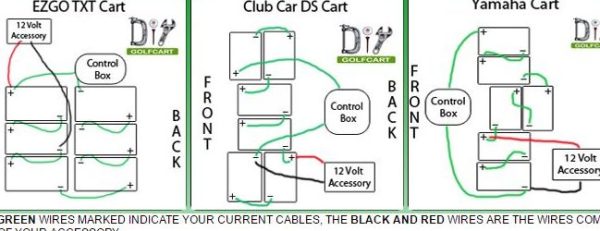
In this article, you will discover a detailed manual for swapping out golf cart electrical parts, covering essential information and step-by-step instructions. The golf cart electrical system overhaul guide will equip you with the knowledge needed to successfully replace components, ensuring your vehicle runs smoothly. From identifying faulty parts to installation tips, this golf cart electrical parts replacement resource provides everything you need for a seamless upgrade.
Understanding Common Golf Cart Electrical Components
When it comes to maintaining your golf cart, a solid grasp of its electrical components is essential for ensuring optimal performance. Familiarity with these parts can help you troubleshoot issues and make informed decisions during repairs. Below, we break down some of the most common electrical components found in golf carts.
Batteries
The heart of your golf cart's electrical system, batteries provide the power needed to operate all electrical components. Most golf carts use lead-acid batteries or lithium-ion batteries:
- Lead-Acid Batteries: Typically more affordable, these batteries require regular maintenance, such as checking water levels and cleaning terminals.
- Lithium-Ion Batteries: These are lighter, more efficient, and have a longer lifespan but come at a higher initial cost.
Controllers
The controller is a critical component that regulates the flow of electricity from the batteries to the motor. It ensures that the golf cart operates smoothly and efficiently by controlling speed and torque. Here are some key points:
- Controllers vary in amperage ratings, influencing the cart's performance.
- Upgrading to a higher-rated controller can enhance speed and responsiveness.
Motors
The motor is responsible for propelling the golf cart. Most carts use either DC or AC motors:
- DC Motors: Generally less expensive and easier to maintain, but they may not offer the same performance as AC motors.
- AC Motors: These provide better acceleration and efficiency, making them ideal for those who demand higher performance.
Wiring and Connectors
The wiring system and connectors are crucial for transmitting electrical signals throughout the cart. High-quality wiring can prevent voltage drops and ensure reliable operation. Key considerations include:
- Use the appropriate gauge wire to handle the electrical load.
- Regularly inspect connectors for corrosion or damage to maintain a solid connection.
Fuse and Relay Systems
The fuse and relay systems protect your golf cart's electrical components from damage caused by overloads or short circuits. Understanding their roles can help you maintain your cart effectively:
- Fuses: Designed to blow when current exceeds safe levels, preventing damage to other components.
- Relays: Act as switches that allow low-power circuits to control high-power circuits, enhancing safety and efficiency.
By familiarizing yourself with these common electrical components, you can better manage your golf cart's maintenance and repairs. Whether you are replacing a battery or upgrading your controller, understanding these elements will empower you to keep your golf cart running smoothly.
Step-by-Step Guide to Replacing Golf Cart Batteries
Replacing golf cart batteries is essential for maintaining optimal performance and longevity. This step-by-step guide will walk you through the process, ensuring that you can replace your batteries efficiently and safely.
Gather the Necessary Tools and Materials
Before starting the replacement process, ensure you have the following tools and materials on hand:
- New Batteries: Select high-quality deep-cycle batteries, typically 6V or 8V, depending on your cart’s specifications. Expect to pay around $100 to $200 per battery.
- Wrench Set: A set of wrenches, including both metric and standard sizes, is essential for loosening and tightening battery terminals.
- Screwdriver: A Phillips or flathead screwdriver may be needed to remove any covers or clamps.
- Safety Gear: Gloves and safety glasses to protect yourself during the process.
- Baking Soda and Water: A solution to clean any corrosion from battery terminals.
Step 1: Safety First
Before beginning, ensure the golf cart is turned off and unplugged from any charging station. Disconnecting the battery while the cart is still powered can lead to sparks and potential injuries.
Step 2: Remove the Old Batteries
1. Open the Battery Compartment: Locate the battery compartment, usually under the seat or a cover.
2. Disconnect the Cables: Start by disconnecting the negative terminal (typically black) first, followed by the positive terminal (usually red). This minimizes the risk of electrical shorts.
3. Remove the Batteries: Lift the old batteries out of the compartment carefully. Be cautious, as they can be heavy.
Step 3: Clean the Battery Compartment
Before installing new batteries, it’s crucial to clean the compartment:
- Mix a solution of baking soda and water to neutralize any acid buildup.
- Wipe down the compartment with a cloth, ensuring it’s dry before proceeding.
Step 4: Install the New Batteries
1. Position the Batteries: Place the new batteries in the same orientation as the old ones. Ensure they fit securely in the compartment.
2. Reconnect the Cables: Connect the positive terminal first, followed by the negative terminal. Ensure connections are tight to prevent any power loss.
3. Check for Corrosion: Inspect the terminals for any signs of corrosion. If present, clean them thoroughly before connecting.
Step 5: Final Checks and Testing
- Inspect Connections: Double-check all connections to ensure they are secure and properly aligned.
- Power On the Cart: Turn on the golf cart to test the new batteries. Ensure all electrical components are functioning correctly.
Tips for Battery Maintenance
- Regularly check battery water levels (for flooded batteries) and keep terminals clean.
- Use a battery maintainer during long periods of inactivity to prolong battery life.
- Store your golf cart in a climate-controlled environment to avoid extreme temperatures affecting battery performance.
Following this detailed guide will help you successfully replace your golf cart batteries and maintain their efficiency for longer rides on the course. By understanding the importance of quality batteries and proper installation, you can enhance your golf cart's performance and enjoy a smoother golfing experience.
Troubleshooting Electrical Issues Before Replacement
When dealing with electrical problems in your golf cart, it's essential to troubleshoot effectively before considering replacement of components. Identifying the root cause can save you time and money. Below are steps and tips to guide you through the troubleshooting process.
Identify Common Symptoms
Understanding the symptoms of electrical issues is the first step in diagnosing the problem. Look for these common signs:
- Dim or Flickering Lights: This may indicate a weak battery or faulty wiring.
- Unresponsive Controls: If the accelerator or brakes aren’t working, check the throttle and brake switches.
- Inconsistent Performance: Sudden drops in speed can point to battery issues or problems with the motor.
Perform a Visual Inspection
A thorough visual inspection can reveal obvious issues. Here’s what to check:
- Wiring: Look for frayed wires, loose connections, or corrosion on terminals.
- Battery: Check for leaks, swelling, or signs of wear. Ensure connections are tight.
- Fuse Box: Inspect fuses for any that may be blown, as this can interrupt electrical flow.
Use a Multimeter for Testing
A multimeter is an invaluable tool for diagnosing electrical issues. Here’s how to use it:
1. Check Battery Voltage: Measure the voltage of your batteries. A fully charged battery should read around 12.6 volts or more.
2. Test Continuity: Use the continuity setting to check for breaks in wires or connections.
3. Assess Load: Test under load conditions to see if the voltage drops significantly, indicating a failing battery or component.
Assess the Electrical Components
Before deciding on replacements, evaluate the functionality of each electrical component:
- Controller: Ensure it’s functioning correctly. If not, recalibrate or replace as needed.
- Solenoid: Listen for clicks when engaging the accelerator. A faulty solenoid may need replacement.
- Motor: Check for unusual noises or overheating, which can indicate internal issues.
Consult the Owner’s Manual
Referencing your golf cart's owner’s manual can provide specific troubleshooting steps tailored to your model. Look for:
- Wiring Diagrams: These can help you trace and understand the electrical layout.
- Component Specifications: Ensure any replacements meet the manufacturer’s recommendations.
- Maintenance Tips: Regular maintenance can prevent issues from arising in the first place.
By following these troubleshooting steps, you can pinpoint the source of electrical issues in your golf cart and determine whether repair is possible or if you need to proceed with component replacement. Understanding the intricacies of your cart’s electrical system is vital for efficient and effective maintenance.
Essential Tools for Golf Cart Electrical Component Replacement
When it comes to replacing electrical components in your golf cart, having the right tools is crucial for a successful and efficient job. Whether you're a seasoned technician or a DIY enthusiast, equipping yourself with the appropriate tools will streamline the replacement process. Below, we outline the essential tools you’ll need for this task.
Basic Hand Tools
For most electrical component replacements, basic hand tools are indispensable. Here’s a list of the primary hand tools you should have:
- Screwdrivers: A set of Phillips and flathead screwdrivers in various sizes will help you remove and install screws.
- Socket Wrench Set: A socket wrench set, particularly with metric and standard sizes, is essential for loosening and tightening bolts.
- Wire Cutters and Strippers: These tools are vital for cutting and stripping wires to ensure proper connections.
Electrical Testing Equipment
To ensure that your golf cart's electrical system is functioning correctly, you’ll need testing equipment. Consider the following:
- Multimeter: A digital multimeter is essential for measuring voltage, current, and resistance in your golf cart's electrical components. Look for models like the Fluke 117, priced around $200, which offers reliable performance.
- Voltage Tester: A non-contact voltage tester can help quickly identify live wires, ensuring safety during your work.
Specialized Tools for Electrical Work
Certain specialized tools can make the replacement of electrical components more manageable:
- Crimping Tool: A crimping tool is necessary for attaching connectors to wires securely. The Klein Tools 3005CR is a popular choice, retailing for about $25.
- Heat Gun: Useful for shrinking heat-shrink tubing, a heat gun helps protect connections and prevents moisture intrusion.
Safety Gear
Always prioritize safety when working on electrical systems. Essential safety gear includes:
- Safety Glasses: Protect your eyes from debris and sparks while working.
- Insulated Gloves: These gloves safeguard against electric shock when handling live wires.
By ensuring you have these essential tools on hand, you will not only facilitate a smoother replacement process for your golf cart's electrical components but also enhance your overall safety and efficiency. Whether you are tackling a comprehensive guide to replacing golf cart electrical components or addressing a specific issue, the right tools will make all the difference.
Maintenance Tips for Prolonging the Life of Electrical Components
To ensure the longevity of your electrical components, particularly in applications like golf carts, regular maintenance is essential. Here are some effective tips to help you keep your electrical systems running smoothly.
Regular Inspections
Conducting routine inspections can identify potential issues before they escalate. Look for:
- Corrosion: Check terminals and connectors for any signs of rust or corrosion, which can impede electrical flow.
- Loose Connections: Ensure that all wiring and connections are tight to prevent voltage drops.
- Frayed Wires: Inspect wires for wear and tear, replacing any that show signs of damage.
Cleanliness is Key
Keeping electrical components clean can significantly enhance their performance. Use the following methods:
- Dusting: Regularly dust off components to prevent buildup that can cause overheating.
- Use of Compressed Air: Blow out any debris from hard-to-reach areas, especially around battery terminals and circuit boards.
Optimal Storage Conditions
Storing electrical components properly can prevent damage. Consider these factors:
- Temperature Control: Keep components in a climate-controlled environment to avoid extreme temperatures that can degrade materials.
- Humidity Levels: Store in a dry place to prevent moisture accumulation, which can lead to corrosion.
Regular Testing and Calibration
Performing routine tests ensures that all components function correctly. This includes:
- Voltage Testing: Use a multimeter to check voltage levels and ensure they meet manufacturer specifications.
- Calibration of Components: Regularly calibrate sensors and controllers to maintain their accuracy.

Utilize Quality Parts
Investing in high-quality electrical components can save you money in the long run. When replacing parts, consider:
- Reputable Brands: Opt for established brands that offer warranties and support, such as Trojan batteries, known for their durability.
- Compatibility: Ensure that replacement components are compatible with your system to avoid future issues.
By following these maintenance tips, you can significantly enhance the lifespan of your electrical components, reducing the need for frequent replacements and ensuring reliable performance. Regular care and attention will keep your systems in top shape, ultimately saving you time and resources.
We truly value your insights and experiences, and we'd love to hear your thoughts or any questions you may have regarding the Golf Cart Electrical Components Replacement Guide. Your input not only enriches our community but also helps others who may be navigating similar challenges. Please feel free to share your opinions in the comments below; together, we can create a supportive space for all golf cart enthusiasts!
Leave a Reply