

This article explores essential golf cart braking system calibration methods to ensure your vehicle operates at peak performance. You'll discover practical tips and expert advice on effective golf cart brake tuning strategies that enhance safety and reliability. Whether you're a seasoned owner or new to golf carts, these techniques will help you maintain optimal braking efficiency.
- Understanding the Importance of Proper Golf Cart Brake Adjustment
-
Step-by-Step Guide to Adjusting Golf Cart Brakes
- Tools and Materials Needed
- Step 1: Prepare the Golf Cart
- Step 2: Inspect the Brake System
- Step 3: Adjust the Brake Cables
- Step 4: Test Brake Pedal Pressure
- Step 5: Check the Brake Pads and Shoes
- Step 6: Clean and Lubricate Components
- Step 7: Reassemble and Test
- Final Tips for Optimal Brake Performance
- Common Signs Indicating Your Golf Cart Brakes Need Adjustment
- Tools Required for Effective Golf Cart Brake Adjustments
- Maintaining Your Golf Cart Brakes for Long-Term Performance
Understanding the Importance of Proper Golf Cart Brake Adjustment
Proper brake adjustment in golf carts is crucial for both safety and performance. Many golfers may overlook this aspect, but ensuring that your brakes are correctly calibrated can significantly enhance your driving experience and prolong the life of your vehicle.
Safety First: Why Brake Adjustment Matters
A well-adjusted brake system ensures that your golf cart can stop effectively, preventing accidents on the course or in residential areas. Here are some key safety considerations:
- Responsive Braking: Properly adjusted brakes provide immediate response, allowing for quick stops when needed.
- Reduced Stopping Distance: When brakes are finely tuned, the stopping distance decreases, which is essential on hilly terrains.
- Preventing Rollaway: If the brakes are too loose, the cart may roll away unintentionally, posing a danger to pedestrians and other vehicles.
Enhancing Performance Through Proper Adjustment
Beyond safety, the efficiency of your golf cart's performance is heavily influenced by the state of its brakes. Here are some performance benefits associated with proper brake adjustment:
- Smoother Operation: Well-adjusted brakes contribute to a smoother ride, enhancing overall comfort while driving.
- Improved Battery Life: Efficient braking can reduce the strain on the battery, as the cart requires less energy to stop.
- Longer Lifespan of Brake Components: Regular adjustments can prevent excessive wear and tear, ultimately extending the life of brake pads and other components.
Signs Your Golf Cart Brakes Need Adjustment
Being aware of the signs that indicate a need for brake adjustment can help you maintain optimal performance. Look out for:
- Unusual Noises: Grinding or squeaking sounds may indicate that the brakes are misaligned.
- Increased Pedal Travel: If you find yourself pressing the brake pedal further than usual to achieve a stop, it may be time for an adjustment.
- Pulling to One Side: If your cart veers to one side when braking, this could signify uneven brake pressure.
Maintaining Your Golf Cart’s Brake System
To ensure your golf cart remains in top condition, regular maintenance is essential. Consider the following tips:
- Routine Inspections: Regularly check the brake system for wear and functionality.
- Professional Servicing: Schedule periodic maintenance with a professional who specializes in golf cart repairs.
- Self-Adjusting Mechanisms: If your golf cart has self-adjusting brakes, ensure they are functioning correctly for optimal performance.
Understanding and implementing proper brake adjustment techniques is key to enjoying a safe and efficient golf cart experience. By prioritizing brake maintenance, you not only enhance your safety but also ensure that your golf cart operates smoothly for years to come.
Step-by-Step Guide to Adjusting Golf Cart Brakes
Adjusting your golf cart brakes is crucial for ensuring safety and optimal performance. This guide will provide you with a detailed approach to effectively adjust the brakes of your golf cart, enhancing your driving experience.
Tools and Materials Needed
Before you begin the adjustment process, gather the following tools and materials:
- Wrench set: To loosen and tighten brake components.
- Screwdriver: For adjusting the brake cables.
- Brake cleaner: To clean brake parts.
- Lubricant: To ensure smooth operation of moving parts.
- Jack and jack stands: To elevate the cart safely.
Step 1: Prepare the Golf Cart
Ensure your golf cart is parked on a flat surface and turn off the ignition. For safety, use the jack to lift the rear of the cart, securing it with jack stands. This will provide you with ample space to work on the brake system.
Step 2: Inspect the Brake System
Before making adjustments, inspect the brake system for wear and damage. Check the brake pads and shoes for thickness, and look for any signs of rust or corrosion. If any parts appear worn out, consider replacing them before proceeding.
Step 3: Adjust the Brake Cables
1. Locate the brake cable adjustment nuts, usually found near the rear wheels.
2. Use a wrench to loosen the nuts slightly.
3. Pull the cable taut and tighten the nuts back up to secure the cable in place. This ensures the brake engages properly without excessive slack.
Step 4: Test Brake Pedal Pressure
After adjusting the cables, press the brake pedal to check for resistance. The pedal should feel firm and responsive. If it sinks to the floor, further adjustments may be needed.
Step 5: Check the Brake Pads and Shoes
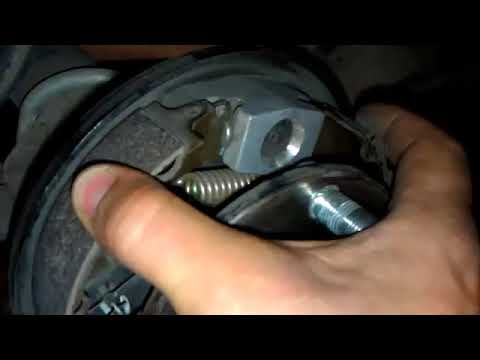
If your golf cart has drum brakes, remove the drum to access the brake shoes. Ensure they are properly aligned and make adjustments as necessary to achieve even contact with the drum.
Step 6: Clean and Lubricate Components
Use brake cleaner to remove any debris or dust from the brake components. After cleaning, apply a light layer of lubricant to the moving parts, such as the pivot points of the brake levers. This will help maintain smooth operation.
Step 7: Reassemble and Test
Once adjustments are complete, reassemble any components you may have removed. Lower the cart from the jack stands and take it for a test drive in a safe area. Test the brakes at low speeds to ensure they engage smoothly and effectively.
Final Tips for Optimal Brake Performance
- Regularly check your golf cart brakes every few months to ensure they are in good condition.
- Replace brake pads and shoes as needed to maintain optimal performance.
- If you experience persistent issues, consult a professional technician for further assistance.
By following these steps, you can effectively adjust your golf cart brakes, ensuring a safer and more enjoyable ride on the course.
Common Signs Indicating Your Golf Cart Brakes Need Adjustment
Maintaining your golf cart's brakes is crucial for both safety and performance. Recognizing the signs that indicate a need for brake adjustment can prevent more serious issues down the road. Here are some common indicators that your golf cart brakes may require attention.
1. Unresponsive Braking
If you notice that your golf cart takes longer to stop or feels unresponsive when you press the brake pedal, it’s a clear sign that adjustments are necessary. This could be due to worn brake pads or misalignment.
2. Uneven Braking Force
When you apply the brakes, if the cart pulls to one side rather than stopping evenly, it may indicate that the brakes on one side are more worn than the other. This uneven braking can lead to instability and requires prompt adjustment.
3. Squeaking or Grinding Noises
Hearing unusual sounds when braking, such as squeaking or grinding, often signals that the brake pads are wearing down or that there is debris in the braking system. Addressing this quickly can enhance your golf cart's safety and performance.
4. Vibration During Braking
Experiencing vibrations or shaking when applying the brakes is another warning sign. This may indicate that the brake components are misaligned or that the rotors are warped, both of which need immediate adjustment.
5. Brake Warning Light Activation
Many modern golf carts are equipped with a brake warning light. If this light illuminates, it serves as an important alert that the braking system needs inspection and possible adjustment to ensure optimal functionality.
Regular Maintenance Tips
To maintain the performance of your golf cart brakes and avoid adjustment issues, consider the following:
- Inspect brake pads: Regularly check for wear and replace them as needed.
- Check brake fluid: Ensure that the brake fluid level is adequate and free from contamination.
- Monitor brake performance: Keep an eye on how your brakes respond during use.
- Schedule routine servicing: Have your golf cart serviced by a professional to address any potential brake issues before they become serious.
Being proactive about these signs can significantly enhance the longevity and effectiveness of your golf cart’s braking system, ensuring a safe and enjoyable ride on the course.
Tools Required for Effective Golf Cart Brake Adjustments
When it comes to ensuring the optimal performance of your golf cart, proper brake adjustments are essential. Having the right tools on hand can make this task easier and more efficient. Below are the necessary tools to help you achieve effective golf cart brake adjustments.
Essential Hand Tools
- Socket Set: A comprehensive socket set is vital for loosening and tightening various components of the brake system. Look for a set that includes both metric and standard sizes, typically ranging from $20 to $100.
- Wrenches: Adjustable wrenches or a set of combination wrenches are necessary for securing nuts and bolts. A reliable set can cost between $15 and $50.
- Phillips and Flathead Screwdrivers: These are crucial for removing any screws that hold the brake assembly together. A good set is usually available for around $10 to $30.
Specialized Tools
- Brake Adjustment Tool: This specialized tool is designed to help fine-tune the brake cables and pads. Prices typically range from $25 to $75, depending on the brand and features.
- Torque Wrench: Ensuring that bolts are tightened to the manufacturer’s specifications is critical for safety. A decent torque wrench can be found for $30 to $100.
Safety Equipment
- Safety Goggles: Protect your eyes from dust and debris during the adjustment process. A pair can cost around $5 to $20.
- Gloves: Using gloves not only provides a better grip but also protects your hands from grease and sharp edges. A box of disposable gloves can be purchased for about $10.
Cleaning Supplies
- Brake Cleaner: Keeping the brake components clean is essential for effective performance. A can of brake cleaner usually costs between $5 and $15.
- Rags or Shop Towels: Having clean rags on hand is useful for wiping down parts and ensuring a clean work environment. A pack can be found for around $10.
By gathering these tools, you can effectively perform golf cart brake adjustments, enhancing the safety and performance of your vehicle. Proper maintenance not only prolongs the life of your cart but also ensures a smooth and secure ride on the golf course.
Maintaining Your Golf Cart Brakes for Long-Term Performance
To ensure your golf cart operates safely and efficiently, regular maintenance of the braking system is essential. Properly functioning brakes not only enhance your cart's performance but also contribute to a safer ride. Here’s how you can maintain your golf cart brakes for longevity and reliability.
Regular Inspection of Brake Components
Conducting routine inspections of your golf cart’s braking components is crucial. Key areas to focus on include:
- Brake Pads: Check for wear and tear. Replace them if they appear worn down to maintain optimal stopping power.
- Brake Cables: Inspect for fraying or rust. Damaged cables can lead to brake failure.
- Brake Drums or Discs: Look for scoring or grooves. Resurfacing or replacing these parts can prevent further damage.
Adjusting Brake Tension
Over time, the tension in your golf cart brakes may loosen, affecting performance. Adjusting the brake tension is a straightforward process:
1. Locate the brake adjustment mechanism, usually found near the rear wheels.
2. Tighten or loosen the adjustment nut until you achieve the desired brake feel.
3. Test the brakes after adjustment to ensure they engage properly.
Regular adjustments can lead to better responsiveness and control while driving.
Cleaning Brake Components
Keeping your brake components clean is vital for performance. Dust, dirt, and debris can accumulate and hinder functionality. To clean your brakes:
- Use a soft brush or compressed air to remove dirt from the brake pads and drums.
- Wipe down the brake cables and mechanisms with a clean cloth.
- Avoid using harsh chemicals that could damage brake components.
Fluid Maintenance
For hydraulic brake systems, checking and maintaining brake fluid is essential. Follow these steps:
- Inspect the brake fluid reservoir for proper levels. If low, top it off with the manufacturer-recommended fluid.
- Replace the brake fluid every two years or as recommended by the manufacturer to prevent moisture buildup and corrosion.
Storage Tips
If you plan to store your golf cart for an extended period, take extra precautions for the brakes:
- Engage the parking brake to keep the brake components in place.
- Elevate the cart slightly to prevent flat spots on the tires and strain on the braking system.
- Cover the cart to protect it from dust and moisture.
By following these maintenance practices, you can significantly extend the life of your golf cart brakes, ensuring they perform optimally when you need them the most. Regular attention to your braking system will provide peace of mind and enhance your overall golfing experience.
We would love to hear your thoughts and questions about Golf Cart Brake Adjustment Techniques! Your insights and inquiries not only enrich our community but also help us all learn and grow together. Please feel free to share your experiences or seek clarification in the comments below—your voice matters, and we’re here to support each other on this journey.
Leave a Reply