In this comprehensive article, you will discover essential information and step-by-step instructions for maintaining your vehicle's braking system with our Golf Cart Brake Fluid Replacement Guide. This resource will cover everything from the importance of regular brake fluid checks to detailed procedures for a successful fluid change. You'll also find tips and best practices to ensure optimal performance and safety, making this your go-to manual for replacing golf cart brake fluid. Prepare to enhance your knowledge with our ultimate resource for golf cart brake fluid maintenance!
Understanding the Importance of Brake Fluid in Golf Carts

Maintaining the safety and functionality of your golf cart heavily relies on the condition of its brake fluid. This crucial fluid plays a vital role in ensuring that your braking system operates effectively. Here’s a closer look at why brake fluid is indispensable for golf carts.
What is Brake Fluid?
Brake fluid is a hydraulic fluid that transmits force within the braking system. It is specifically designed to withstand high temperatures and maintain its viscosity under varying conditions, ensuring optimal performance when you need to stop quickly.
Key Functions of Brake Fluid
The importance of brake fluid can be understood through its essential functions:
- Hydraulic Transmission: Brake fluid transfers force from the brake pedal to the brake components, allowing for smooth and effective stopping.
- Corrosion Protection: Quality brake fluids contain additives that protect metal components from rust and corrosion, which can extend the life of the braking system.
- Temperature Regulation: Brake fluid helps in dissipating heat generated during braking, preventing overheating and maintaining consistent braking performance.
Signs of Deteriorating Brake Fluid
Recognizing when brake fluid needs attention is essential for your safety. Look for these signs:
- Cloudy Appearance: Clear brake fluid should be transparent. If it appears cloudy or discolored, it may be contaminated.
- Low Fluid Level: A significant drop in brake fluid levels can indicate a leak or excessive moisture absorption.
- Soft or Spongy Brake Pedal: If the brake pedal feels soft or requires excessive pressure, it may be a sign of degraded brake fluid.
Maintaining Brake Fluid Quality
To ensure the reliability of your golf cart’s braking system, regular maintenance of brake fluid is necessary. Here are some best practices:
- Regular Checks: Inspect the brake fluid level and condition regularly, ideally during routine maintenance.
- Fluid Replacement: Replace the brake fluid according to the manufacturer's recommendations, usually every two years or as needed based on the condition.
- Use Quality Products: Opt for high-quality brake fluids that meet the specifications outlined in your golf cart’s manual.
Choosing the Right Brake Fluid
Selecting the appropriate brake fluid is crucial for maintaining your golf cart’s braking efficiency. Ensure that you refer to your owner's manual for the correct specifications. Common types include:
- DOT 3: A glycol-based fluid suitable for most golf carts, known for its good moisture resistance.
- DOT 4: Offers a higher boiling point than DOT 3, making it ideal for more demanding conditions.
By understanding the importance of brake fluid and its role in your golf cart’s safety, you can take proactive steps to maintain your vehicle’s braking system, ensuring a smooth and safe ride every time you hit the course.
Step-by-Step Process for Replacing Golf Cart Brake Fluid
Replacing the brake fluid in your golf cart is essential for maintaining optimal braking performance and safety. This step-by-step guide will walk you through the process, ensuring you can perform this task with confidence and ease.
What You Will Need
Before you begin, gather the following tools and materials:
- New brake fluid (DOT 3 or DOT 4 recommended)
- Wrench set (specific size may vary by model)
- Brake fluid syringe or turkey baster
- Rags for cleanup
- Safety glasses and gloves
Step 1: Prepare the Golf Cart
Start by ensuring your golf cart is parked on a flat, stable surface. Engage the parking brake and remove the keys to prevent accidental movement. This is a crucial safety measure.
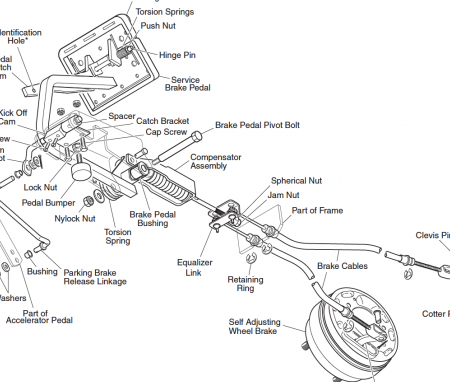
Step 2: Locate the Brake Fluid Reservoir
Identify the brake fluid reservoir, typically found near the rear of the golf cart. It is usually a translucent container, allowing you to check the fluid level easily.
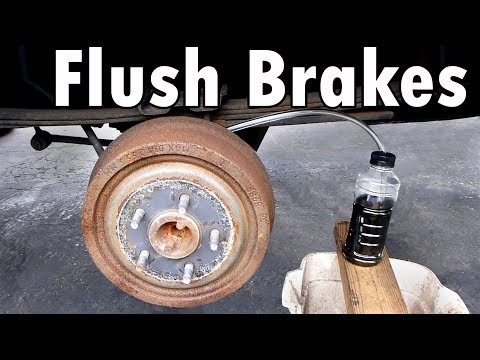
Step 3: Remove Old Brake Fluid
Using a syringe or turkey baster, carefully extract the old brake fluid from the reservoir. Make sure to dispose of the fluid properly, as it can be harmful to the environment.
Tip:
To ensure thorough removal, you may want to gently shake the cart to help any residual fluid drain out.
Step 4: Clean the Reservoir
Wipe the inside of the reservoir with a clean rag to remove any debris or contaminants. This step is vital for preventing any potential damage to the braking system.
Step 5: Add New Brake Fluid
Pour the new brake fluid into the reservoir until it reaches the recommended fill line. Be cautious not to overfill, as this can lead to spillage and contamination.
Step 6: Bleed the Brake Lines
To ensure there are no air bubbles in the brake lines, bleeding is necessary. Locate the bleeder valve on each brake, typically found on the wheel cylinder.
- Have a helper pump the brake pedal a few times.
- Close the valve while your helper holds the brake pedal down.
- Repeat until you see a steady stream of fluid without air bubbles.
Step 7: Check the Brake System
After bleeding the brakes, check the brake fluid level again. Add more fluid if necessary. Ensure that the reservoir cap is securely fastened.
Step 8: Test the Brakes
Before taking your golf cart out for a ride, perform a quick brake test. Press the brake pedal to ensure it feels firm and responsive.
Maintaining your golf cart's braking system is vital for safe operation. Following these steps for brake fluid replacement will help ensure your golf cart operates smoothly and safely. Regular maintenance is key to prolonging the life of your braking system and enhancing your overall driving experience.
Signs Your Golf Cart Needs Brake Fluid Replacement
Recognizing the indicators that your golf cart requires brake fluid replacement is essential for maintaining safety and performance. Here are some key signs to watch for:
1. Spongy or Soft Brake Pedal
If you notice that the brake pedal feels unusually spongy or soft when pressed, this may indicate low brake fluid levels or air trapped in the brake lines. A properly functioning brake system should provide a firm and responsive feel.
2. Warning Light Activation
Many modern golf carts are equipped with a dashboard warning light for brake issues. If this light illuminates, it’s a clear sign that you should check your brake fluid. Ignoring this alert could lead to more severe braking problems.
3. Unusual Noises When Braking
Listen for any strange sounds, such as grinding or squeaking, when applying the brakes. These noises can suggest that the brake components are not receiving adequate lubrication due to insufficient brake fluid, which may require immediate attention.
4. Visible Fluid Leaks
Inspect the area around your golf cart for any signs of brake fluid leaks. Puddles or spots of fluid can indicate a leak in the brake system, necessitating a fluid replacement and potential repairs.
5. Reduced Braking Performance
If you find that your golf cart is taking longer to stop than usual, or if the brakes feel less effective, this could signal that the brake fluid is contaminated or has degraded. Timely replacement is crucial to restore optimal braking performance.
6. Frequent Need for Brake Adjustments
If you find yourself adjusting the brakes more often than normal, it may be time to inspect the brake fluid. Frequent adjustments can indicate underlying issues that could be resolved with a fluid replacement.
Maintaining Your Brake Fluid
To ensure the longevity and effectiveness of your golf cart’s braking system, consider the following maintenance tips:
- Regular Inspections: Check the brake fluid level periodically to avoid unexpected issues.
- Use Quality Brake Fluid: Always opt for high-quality brake fluid recommended for your specific golf cart model.
- Monitor for Changes: Pay attention to any changes in brake performance and address them promptly.
By being aware of these signs, you can take proactive measures to ensure your golf cart remains safe and reliable, ultimately enhancing your overall golfing experience.
Choosing the Right Brake Fluid for Your Golf Cart

Selecting the appropriate brake fluid for your golf cart is crucial for ensuring optimal braking performance and safety. The right brake fluid not only enhances the longevity of your braking system but also maintains its efficiency. Here’s a guide to help you navigate your options.
Types of Brake Fluid
When choosing brake fluid, you’ll encounter several types, each with distinct properties:
- DOT 3: A glycol-based fluid suitable for most golf carts. It has a lower boiling point, making it ideal for casual use.
- DOT 4: Offers a higher boiling point than DOT 3, making it more resistant to moisture absorption. This type is ideal for carts that see more frequent or intense use.
- DOT 5: Silicone-based fluid that is non-hygroscopic, meaning it doesn’t absorb moisture. This can be beneficial for long-term storage but may not be compatible with all systems.
Compatibility with Your Golf Cart
Always check your golf cart’s manufacturer specifications to ensure compatibility with the brake fluid you choose. Using the wrong type can lead to system failure or damage. Most golf carts are designed to work with either DOT 3 or DOT 4 fluids, but it’s essential to verify.
Factors to Consider
When selecting brake fluid, consider the following:
- Operating Environment: If you frequently use your golf cart in wet conditions, a fluid with a higher boiling point, like DOT 4, may be more appropriate.
- Usage Frequency: For regular use, opt for a fluid that offers enhanced performance under stress.
- Storage Conditions: If your cart is stored for long periods, consider using DOT 5 to minimize moisture issues.
Maintenance Tips
To maintain optimal braking performance, regularly check your brake fluid levels and condition. Replace the fluid according to your manufacturer’s recommendations, typically every 2 to 3 years. Signs that you may need to change your brake fluid include:
- Discoloration of the fluid
- Increased brake pedal travel
- Unusual noises during braking
By understanding the types of brake fluid available and considering your golf cart's specific needs, you can ensure a safe and smooth ride. Selecting the right brake fluid is an essential part of maintaining your golf cart's braking system effectively.
Common Mistakes to Avoid During Brake Fluid Replacement
Replacing brake fluid is a crucial maintenance task that ensures the safety and performance of your vehicle. However, several common mistakes can undermine this process. Here are the key errors to avoid when performing brake fluid replacement.
1. Neglecting to Use the Correct Brake Fluid Type
Using the wrong type of brake fluid can lead to severe braking issues. Different vehicles require specific fluid types, such as DOT 3, DOT 4, or DOT 5. Always check your owner’s manual to ensure you are using the appropriate fluid for your golf cart.
2. Failing to Check for Contamination
Before adding new brake fluid, it’s essential to inspect the old fluid for signs of contamination. Look for a dark color or particles floating in the fluid, indicating moisture or dirt presence. Contaminated fluid can compromise braking efficiency, so always replace it if necessary.
3. Skipping the Brake Bleeding Process
After replacing the fluid, skipping the bleeding process can lead to air bubbles in the brake lines. This can result in a spongy brake pedal feel and reduced braking power. Follow the proper bleeding procedure to ensure all air is removed from the system, providing optimal performance.
Bleeding Techniques to Consider
- Gravity Bleeding: Allowing gravity to help push the fluid through the system.
- Manual Pumping: Having an assistant pump the brake pedal while you open and close the bleeder valve.
- Vacuum Bleeding: Using a vacuum pump to draw fluid and air out of the system.
4. Ignoring Safety Precautions
Safety should always be a priority during any maintenance task. Ensure you wear gloves and eye protection when handling brake fluid, as it is corrosive and can damage paint and skin. Also, work in a well-ventilated area to avoid inhaling harmful fumes.
5. Overfilling the Brake Fluid Reservoir
While it may seem harmless, overfilling the brake fluid reservoir can lead to pressure buildup and potential leaks. Always fill the reservoir to the recommended level specified in your golf cart’s manual to maintain proper brake function.
6. Not Testing the Brakes After Replacement
Once you’ve replaced the brake fluid and completed the bleeding process, it’s vital to test the brakes before returning the vehicle to regular use. Ensure that the brake pedal feels firm and responsive. Conduct a few test stops at low speeds to confirm the brakes are functioning correctly.
By avoiding these common mistakes, you can ensure a successful brake fluid replacement, enhancing the safety and performance of your vehicle. Remember, proper maintenance is key to a smooth and safe driving experience.
We truly value your insights and experiences, and we invite you to share your thoughts or any questions you may have about our Golf Cart Brake Fluid Replacement Guide in the comments section below. Your feedback not only enriches our community but also helps fellow enthusiasts navigate their own maintenance journeys with confidence. Whether you have tips to offer or seek clarification on a specific point, we look forward to hearing from you!
Leave a Reply