
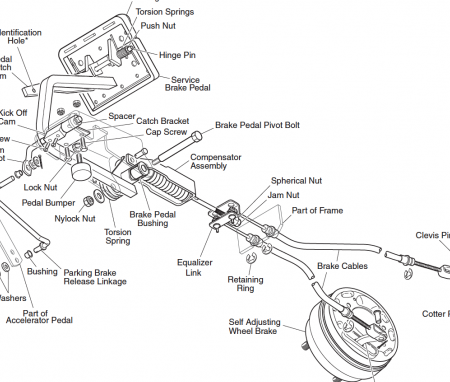
This article offers a detailed exploration of golf cart braking system diagnostic procedures, providing essential insights and practical solutions for common issues. Readers will find step-by-step guidance on identifying and resolving problems, ensuring optimal performance of their vehicles. With a focus on golf cart brake system repair techniques, this comprehensive guide is designed to empower users to tackle brake-related challenges effectively.
Common Symptoms of Golf Cart Brake Issues
Identifying brake issues in your golf cart is crucial for ensuring safe operation. Below are some common symptoms that may indicate problems with your golf cart's brake system.
1. Unresponsive Brakes
If you notice that pressing the brake pedal doesn't yield the expected stopping power, it may signal a malfunction. This could be due to a variety of reasons, including air in the brake lines or worn-out brake pads.
2. Grinding Noises
Hearing a grinding sound when you apply the brakes can indicate that the brake pads are worn down and are making contact with the rotor. This not only reduces braking efficiency but can also lead to further damage if not addressed promptly.
3. Vibration During Braking
Experiencing vibrations or shaking when braking can be a sign of warped brake components or uneven wear. This can compromise your ability to stop safely and may require immediate attention.
4. Brake Fluid Leaks
Visible puddles of brake fluid under your golf cart can indicate a leak in the brake system. Regularly checking your brake fluid levels is essential, as low fluid can lead to brake failure.
5. Increased Stopping Distance
If your golf cart takes longer to come to a stop than usual, this could suggest that your brakes are not functioning optimally. Factors like worn brake pads or malfunctioning hydraulic systems can contribute to this issue.
6. Brake Warning Light
Many modern golf carts come equipped with a dashboard warning light for brake issues. If this light illuminates, it's important to investigate the problem immediately, as it serves as an alert for potential safety hazards.
Regular Maintenance Tips
To keep your golf cart brake system in top shape, consider the following maintenance practices:
- Regularly check and replace brake pads as needed.
- Inspect brake fluid levels and look for leaks.
- Monitor the performance of the brake system during routine use.
- Schedule professional inspections at least once a year.
Being aware of these symptoms can help you take proactive measures in addressing golf cart brake issues, ensuring a safe and enjoyable ride.
Essential Tools for Golf Cart Brake System Troubleshooting
When it comes to maintaining and repairing your golf cart's brake system, having the right tools is crucial for effective troubleshooting. The following tools will help you diagnose and resolve common brake issues, ensuring safety and optimal performance on the course.
1. Socket and Wrench Set
A comprehensive socket and wrench set is essential for accessing various components of the brake system. Look for sets that include both metric and standard sizes to accommodate different fasteners commonly found in golf carts.
- Recommendation: A 3/8-inch drive socket set with 10mm to 19mm sockets is ideal for most golf cart models.
- Tip: Choose a set with a ratcheting mechanism for quicker adjustments.
2. Brake Fluid Tester
Ensuring that your brake fluid is in good condition is vital for brake performance. A brake fluid tester allows you to check the moisture content and overall quality of the fluid.
- Recommendation: Look for a digital brake fluid tester, which can provide accurate readings quickly.
- Tip: Regularly test your brake fluid, especially if you notice changes in braking performance.
3. Multimeter
Electrical issues can sometimes affect brake functionality, particularly in electric golf carts. A multimeter can help you diagnose electrical problems within the brake system.
- Recommendation: A digital multimeter with auto-ranging capabilities simplifies the testing process.
- Tip: Use the multimeter to check for voltage drops across connections and components.
4. Brake Pad Gauge
To assess the condition of your brake pads, a brake pad gauge is an indispensable tool. This tool allows you to measure the thickness of the pads and determine whether they need replacement.
- Recommendation: A gauge that provides both imperial and metric measurements can be very useful.
- Tip: Replace brake pads once they reach the manufacturer's minimum thickness specifications.
5. Hydraulic Jack
For any brake system repair or inspection, lifting the golf cart safely is paramount. A hydraulic jack is essential for elevating the cart to access the brake components.
- Recommendation: Choose a hydraulic jack with a capacity of at least 2 tons for stability.
- Tip: Always use jack stands to secure the cart once it’s lifted.
6. Safety Gear
Safety should never be overlooked during troubleshooting. Equip yourself with appropriate safety gear to protect against potential hazards.
- Recommendation: Wear gloves and safety goggles to shield your hands and eyes from debris and chemicals.
- Tip: Keep a first-aid kit nearby in case of minor accidents.
By utilizing these essential tools, you can efficiently troubleshoot and maintain your golf cart's brake system, ensuring a safe and enjoyable ride on the greens. Each tool plays a critical role in diagnosing issues, from checking fluid quality to inspecting mechanical components. Prioritize having these tools on hand for effective and timely golf cart brake system troubleshooting.
Step-by-Step Guide to Inspecting Golf Cart Brake Components
When it comes to ensuring the safety and performance of your golf cart, inspecting the brake components is crucial. This guide will help you systematically assess the key elements of your golf cart’s braking system, ensuring a smooth and safe ride on the course.
1. Gather Necessary Tools and Equipment
Before you begin your inspection, make sure you have the following tools on hand:
- Wrench set – For loosening and tightening bolts.
- Screwdriver – To access brake components.
- Brake cleaner – For cleaning parts.
- Safety goggles – To protect your eyes during inspection.
- Jack stands – For safely lifting the golf cart.
2. Safely Lift the Golf Cart
Utilize a jack to elevate the rear or front of the golf cart, depending on where the brakes are located. Always use jack stands to ensure stability while you work underneath.
3. Inspect Brake Pads and Shoes
Check the thickness of the brake pads or shoes:
- If they appear worn down to less than 1/8 inch, they should be replaced.
- Look for any signs of cracking or uneven wear, which may indicate a need for adjustment or replacement.
4. Examine Brake Drums and Rotors
For golf carts with drum brakes, inspect the interior of the drums:
- Check for scoring or excessive wear.
- Ensure that there is no rust buildup that could impede function.
For those with disc brakes:
- Look for any grooves or uneven surfaces on the rotors.
- Measure the rotor thickness; if it’s below the manufacturer’s specifications, it may need replacement.
5. Assess Brake Lines and Hoses
Inspect all brake lines and hoses for signs of leaks or wear:
- Look for cracks, bulges, or fraying.
- Ensure that connections are tight and free of corrosion.
6. Test the Brake Pedal
With the golf cart still elevated, press the brake pedal:
- It should feel firm and responsive.
- If the pedal sinks to the floor or feels spongy, there may be air in the brake lines or a leak.
7. Check the Brake Fluid Level
Locate the brake fluid reservoir:
- Ensure the fluid is at the appropriate level, as indicated by the markings on the reservoir.
- If low, top it up with the manufacturer-recommended fluid.
8. Reassemble and Test Drive
After completing your inspection:
- Reattach any components you removed.
- Lower the golf cart and take it for a test drive to assess brake performance.
Regularly inspecting your golf cart brake components can significantly enhance safety and prolong the lifespan of your braking system. Following this detailed guide will help you keep your golf cart in optimal condition, ensuring a reliable experience on the greens.
How to Adjust and Replace Golf Cart Brake Parts
When it comes to maintaining your golf cart, ensuring that the brake system functions effectively is paramount for safety and performance. Knowing how to adjust and replace golf cart brake parts can save you time and money while keeping your cart in top condition. Below are essential steps and tips for successfully completing this task.
Understanding Your Golf Cart Brake System
Before diving into adjustments and replacements, familiarize yourself with the key components of your golf cart's brake system:
- Brake Pads: These are the components that create friction to slow down or stop the cart.
- Brake Shoes: Found in drum brake systems, these shoes press against the drum to provide stopping power.
- Brake Lines: These are responsible for transferring hydraulic fluid in hydraulic brake systems.
- Brake Fluid: Essential for hydraulic systems, ensuring proper function of the brakes.
Adjusting Golf Cart Brake Parts
Adjustments can often resolve minor issues without the need for replacement. Here’s how to adjust your golf cart brakes effectively:
Step 1: Inspect the Brake System
Begin by checking the overall condition of the brake system. Look for wear on brake pads or shoes, and ensure that all components are securely attached.
Step 2: Adjust Brake Cable Tension
For carts with cable-operated brakes:
- Locate the brake cable adjustment mechanism.
- Use a wrench to loosen the locking nut.
- Pull the cable to increase tension or release it to decrease tension.
- Tighten the locking nut once the desired tension is achieved.
Step 3: Test Brake Response
After adjusting, test the brakes by pressing the pedal. They should engage smoothly without excessive travel. If not, repeat the adjustment process.
Replacing Golf Cart Brake Parts
When brake components are worn beyond adjustment, replacement is necessary. Here’s a detailed approach:
Step 1: Gather Necessary Tools and Parts
Ensure you have the following tools and parts ready:
- Replacement brake pads or shoes (typically priced between $30 and $80)
- Wrenches and sockets
- Screwdrivers
- Brake cleaner
- Lubricant
Step 2: Remove the Wheel and Brake Assembly
- Safely lift the golf cart and remove the wheel using a lug wrench.
- Unscrew the brake assembly, noting the orientation for reinstallation.
Step 3: Replace Worn Parts
- Remove the old brake pads or shoes.
- Clean the brake assembly with brake cleaner.
- Install the new brake pads or shoes, ensuring they fit snugly.
Step 4: Reassemble and Test
- Reattach the brake assembly and wheel.
- Lower the cart and test the brakes by pressing the pedal. Ensure they engage smoothly and effectively.
By following these steps for adjusting and replacing your golf cart brake parts, you can ensure a safe and enjoyable ride. Regular maintenance will not only prolong the life of your brakes but also enhance your overall golfing experience.
Preventive Maintenance Tips for Golf Cart Brake Systems
Maintaining the brake system of your golf cart is crucial for safety and optimal performance. By implementing regular preventive maintenance, you can extend the life of your brakes and enhance your overall driving experience. Here are some effective tips to keep your golf cart brake system in top condition.
Regular Inspection of Brake Components
Conducting routine inspections is essential to identify potential issues before they escalate. Focus on the following components:
- Brake Pads: Check for wear and tear. If the pads are thinner than 1/8 inch, it’s time for a replacement.
- Brake Lines: Inspect for leaks, cracks, or corrosion. Any damage can compromise braking efficiency.
- Brake Fluid: Ensure the brake fluid is at the proper level and free from contaminants.
Cleaning Brake Components
Dirt and debris can affect the functionality of your golf cart brake system. Regular cleaning can prevent buildup that may lead to malfunctions. Follow these steps:
- Remove Brake Dust: Use a soft brush or compressed air to clean brake pads and calipers.
- Flush Brake Lines: Periodically flush the brake lines with fresh fluid to remove moisture and contaminants.
Adjustment of Brake System
Proper adjustment of your brake system ensures effective stopping power. Pay attention to:
- Brake Cable Tension: Check and adjust the tension of the brake cables. Loose cables can lead to ineffective braking.
- Alignment: Ensure that brake components are correctly aligned to avoid uneven wear.
Routine Brake Fluid Replacement
Brake fluid absorbs moisture over time, which can reduce braking efficiency. It’s advisable to replace the brake fluid at least once a year. Choose a high-quality brake fluid compatible with your golf cart model, typically around $10 to $20 per quart.

Storage Considerations
If you store your golf cart for an extended period, take precautions to protect the brake system:
- Park on Level Ground: This prevents fluid from pooling and reduces pressure on the brake components.
- Engage the Parking Brake: Ensure the parking brake is engaged to keep the brakes in working order during storage.
Regular maintenance of your golf cart brake system is essential for safe operation and longevity. By following these preventive maintenance tips, you can help ensure your golf cart is always ready for the course.
We’d love to hear your thoughts and experiences regarding Golf Cart Brake System Troubleshooting Steps! Your insights and questions not only enrich our community but also help fellow enthusiasts tackle similar challenges. Whether you have a tip to share or need clarification on a specific issue, please feel free to leave a comment. Together, we can create a supportive space for all things golf cart-related!
Leave a Reply