
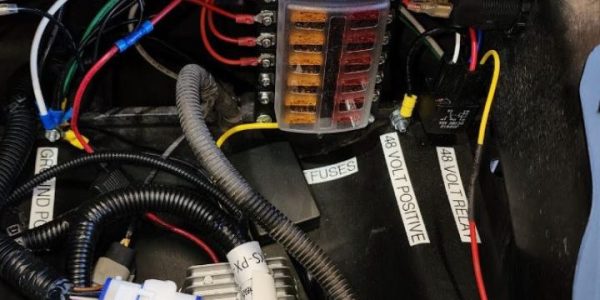
This article delves into golf vehicle electrical fuse panel maintenance, offering essential tips and techniques for effective troubleshooting and repair. Readers will discover practical advice on diagnosing issues, selecting the right tools, and ensuring safe handling of electrical components in golf cart fuse box repairs. Whether you're a seasoned technician or a DIY enthusiast, this guide will equip you with the knowledge needed for successful golf cart electrical system repairs.
- Understanding the Function of the Golf Cart Electrical Fuse Box
- Common Signs Indicating a Need for Golf Cart Electrical Fuse Box Repair
- Step-by-Step Guide to Repairing Your Golf Cart Electrical Fuse Box
- Tools and Materials Needed for Golf Cart Electrical Fuse Box Repair
- Preventative Maintenance Tips for Your Golf Cart's Electrical Fuse Box
Understanding the Function of the Golf Cart Electrical Fuse Box
The golf cart electrical fuse box plays a crucial role in the overall electrical system of your golf cart. It acts as a central hub for managing the electrical circuits, ensuring that various components receive the power they need while protecting them from overloads.
Key Functions of the Fuse Box
The golf cart fuse box is responsible for several essential functions, including:
- Protection Against Overcurrent: The fuse box contains fuses that will blow or trip when excessive current flows through the circuits, preventing potential damage to electrical components.
- Distribution of Power: It distributes electrical power to various parts of the golf cart, such as lights, motors, and accessories, ensuring they operate efficiently.
- Maintenance of Circuit Integrity: By isolating circuits, the fuse box helps maintain the integrity of the overall electrical system, making it easier to diagnose issues when they arise.
Components of the Fuse Box
Understanding the components within the fuse box can enhance your knowledge of how it functions:
- Fuses: These are the protective devices that blow when too much current passes through, safeguarding your cart’s electrical system.
- Terminals: These connection points allow for the attachment of wires from various electrical components, facilitating efficient power distribution.
- Labels: Many fuse boxes have labeled circuits to help identify which fuse corresponds to which component, simplifying troubleshooting.
While the fuse box is designed for durability, it can experience issues over time. Common problems include:
- Blown Fuses: Frequent blown fuses may indicate an underlying electrical issue, such as a short circuit or faulty wiring.
- Corrosion: Moisture can lead to corrosion within the fuse box, impacting electrical connections and performance.
- Poor Connections: Loose or damaged connections can lead to intermittent power loss to various components.
Maintenance Tips for the Fuse Box
Regular maintenance of the golf cart electrical fuse box can prevent issues and extend its lifespan. Here are some tips:
- Regular Inspection: Check the fuse box periodically for signs of wear, corrosion, or damage.
- Clean Connections: Keep the terminals clean and free from dirt and moisture to ensure good electrical contact.
- Replace Blown Fuses Promptly: Address blown fuses immediately by replacing them with the correct type to maintain circuit integrity.
Understanding the function of the golf cart electrical fuse box is essential for maintaining your vehicle's performance. By keeping an eye on its condition and addressing any issues promptly, you can ensure your golf cart operates smoothly and efficiently.
Common Signs Indicating a Need for Golf Cart Electrical Fuse Box Repair
When it comes to maintaining your golf cart, recognizing the signs that your electrical fuse box may require attention is crucial. Below are some key indicators that suggest it might be time for a repair.
1. Frequent Blown Fuses
If you find yourself replacing fuses regularly, it’s a clear sign of underlying electrical issues. Blown fuses are designed to protect your golf cart’s electrical system from overload, but if they are blowing frequently, it could indicate a problem with the fuse box itself or a short circuit in the wiring.
2. Inconsistent Power Supply
Experiencing intermittent power loss can be frustrating. If your golf cart’s lights, horn, or other electrical components are working sporadically, this inconsistency could stem from a failing fuse box. A thorough inspection may be necessary to identify the cause.
3. Burning Smell or Discoloration
A burning smell or any discoloration around the fuse box area should never be ignored. These signs may indicate overheating or electrical shorts, which can lead to more severe damage if not addressed promptly. If you notice these symptoms, it’s essential to stop using the golf cart and seek professional repair services.
4. Difficulty Starting the Cart
If your golf cart struggles to start or fails to start altogether, it could be a sign that the electrical connections within the fuse box are compromised. Check the fuse box for loose connections or signs of corrosion that may be affecting the ignition system.
5. Faulty Accessories
When specific accessories, like headlights or dashboard indicators, stop functioning correctly, the issue may lie within the fuse box. If replacing the relevant fuses does not resolve the issue, further investigation into the fuse box's integrity is warranted.
Quick Checklist for Golf Cart Owners
- Monitor fuse replacements: Track how often you replace fuses.
- Inspect for smells: Be vigilant for any burning odors near the fuse box.
- Check connections: Regularly inspect wiring and connections for corrosion.
- Test accessories: Ensure all electrical components are functioning as intended.
Addressing these signs early can prevent more significant issues down the road, ensuring your golf cart remains reliable and safe to operate. If you encounter any of these symptoms, consulting with a qualified technician who specializes in golf cart electrical systems is highly recommended.
Step-by-Step Guide to Repairing Your Golf Cart Electrical Fuse Box
Repairing your golf cart's electrical fuse box can seem daunting, but with a clear step-by-step approach, you can effectively troubleshoot and resolve any issues. This guide will walk you through the essential processes needed to ensure your golf cart is back up and running smoothly.
Step 1: Gather Necessary Tools and Materials
Before starting the repair, it’s crucial to have the right tools on hand. Here’s what you’ll need:
- Screwdriver Set: A variety of screwdrivers to fit different screws.
- Multimeter: For testing electrical connections and continuity.
- Replacement Fuses: Ensure you have the correct amperage for your golf cart.
- Wire Strippers: For any necessary wire repairs or replacements.
- Electrical Tape: To secure connections and prevent short circuits.
Step 2: Disconnect the Battery
Safety is paramount when working with electrical systems. Start by disconnecting the battery:
- Locate the battery compartment of your golf cart.
- Remove the negative (-) terminal first, followed by the positive (+) terminal.
- Store the battery cables safely to avoid accidental reconnection.
Step 3: Inspect the Fuse Box
Examine the fuse box for any visible signs of damage:
- Look for burnt or blown fuses, which may appear discolored or have a broken filament.
- Check for corrosion on the terminals, which can impede electrical flow.
- Inspect the wiring for any frays or breaks that could cause shorts.
Step 4: Replace Blown Fuses
If you identify any blown fuses, follow these steps:
- Carefully remove the damaged fuse using your screwdriver.
- Insert a new fuse of the same amperage rating. For example, if your golf cart uses a 15-amp fuse, ensure the replacement is also rated at 15 amps.
Step 5: Repair or Replace Damaged Wiring
If you discover damaged wires, you’ll need to address these issues:
- If the wire is frayed, use wire strippers to remove the damaged section and reconnect using a wire connector.
- For complete breaks, cut out the damaged section and splice in a new piece of wire, securing it with electrical tape.
Step 6: Reconnect the Battery
Once repairs are complete, reconnect the battery:
- Start by connecting the positive (+) terminal first.
- Follow with the negative (-) terminal to ensure a safe connection.
Step 7: Test the System
Finally, check your work to ensure everything is functioning properly:
- Turn on your golf cart and check for any electrical issues.
- Use the multimeter to verify that voltage is flowing through the fuse box.
By following these detailed steps, you can effectively repair your golf cart's electrical fuse box and keep your cart in optimal working condition. Regular maintenance and prompt repairs will help you avoid larger issues in the future.
Tools and Materials Needed for Golf Cart Electrical Fuse Box Repair
Repairing a golf cart electrical fuse box requires specific tools and materials to ensure a successful and safe fix. Having the right equipment on hand can make the process smoother and more efficient. Below are the essential tools and materials you will need for this task.
Essential Tools
To effectively tackle the repair of a golf cart electrical fuse box, consider gathering the following tools:
- Screwdrivers: A set of both flathead and Phillips screwdrivers will be necessary for removing screws that secure the fuse box cover and components.
- Wire Strippers: These are crucial for safely stripping the insulation from electrical wires when making repairs or replacements.
- Multimeter: This device is essential for diagnosing electrical issues, checking continuity, and ensuring that the fuses and wiring are functioning properly.
- Socket Wrench Set: A socket wrench will assist in removing bolts that may be securing the fuse box to the golf cart chassis.
- Needle-Nose Pliers: These are useful for gripping and manipulating wires in tight spaces within the fuse box.
Materials Required
In addition to tools, having the right materials is equally important for a successful golf cart electrical fuse box repair. The following items should be on your checklist:
- Replacement Fuses: Ensure you have the correct amperage fuses for your specific golf cart model, typically ranging from $5 to $15 for a pack.
- Electrical Tape: This will help insulate any exposed wiring and prevent short circuits. A roll typically costs around $3 to $5.
- Wire Connectors: These are necessary for securely connecting new wires to existing ones, with prices usually between $10 and $20 for a variety pack.
- Heat Shrink Tubing: This is used to protect soldered connections and ensure durability, generally available for about $5 to $10.
- Cleaning Supplies: Use contact cleaner and a cloth to clean terminals and connections, with cleaners priced around $8 to $15.
Safety Gear
Don't forget to prioritize safety during your repair process. Consider using:
- Safety Glasses: Protect your eyes from any debris while working.
- Gloves: Wearing gloves can prevent electrical shocks and protect your hands from sharp edges.
By assembling these tools and materials before starting your golf cart electrical fuse box repair, you will streamline the process and enhance your chances of a successful outcome.
Preventative Maintenance Tips for Your Golf Cart's Electrical Fuse Box
Maintaining your golf cart's electrical fuse box is essential for ensuring optimal performance and longevity. Below are key tips to help you effectively manage this critical component of your golf cart.
Regular Visual Inspections
Conducting regular visual inspections of your golf cart's electrical fuse box can help identify potential issues before they escalate. Look for:
- Corrosion: Check for any signs of rust or corrosion on the terminals and connections.
- Loose Connections: Ensure that all wires and connections are securely fastened.
- Damaged Fuses: Inspect fuses for any cracks or burn marks that may indicate failure.
Keep It Clean
A clean fuse box is essential for efficient electrical flow. Dust and debris can accumulate and interfere with connections. Here are some cleaning tips:
- Disconnect Power: Always disconnect the battery before cleaning to avoid electrical shocks.
- Use a Soft Brush: Gently brush away dirt and dust from the fuse box.
- Wipe Down Surfaces: Use a damp cloth to wipe the outer surfaces, ensuring no moisture enters the box.
Monitor Fuse Ratings
Understanding the rating of fuses in your golf cart's electrical fuse box is crucial. Using the correct amperage is vital to prevent overheating and potential damage. Follow these steps:
- Check Specifications: Refer to your golf cart’s manual for the correct fuse ratings.
- Replace with Exact Matches: When replacing fuses, ensure they match the original specifications to maintain safety.
Test Electrical Components
Routine testing of electrical components linked to the fuse box can prevent future complications. Implement the following:
- Multimeter Use: Utilize a multimeter to test voltage and continuity in the circuits.
- Functionality Checks: Regularly check the functionality of lights, motors, and other electrical components.

Schedule Professional Inspections
While DIY maintenance is essential, it’s wise to schedule professional inspections periodically. A qualified technician can:
- Identify Hidden Issues: Detect problems that may not be visible during regular checks.
- Ensure Compliance: Confirm that your electrical system meets safety standards.
By implementing these preventative maintenance tips, you can significantly enhance the reliability and safety of your golf cart's electrical fuse box, ensuring smooth rides on the course for years to come.
We would love to hear your thoughts and questions about Golf Cart Electrical Fuse Box Repair! Your insights and inquiries can foster a vibrant discussion and help others in our community. Please feel free to share your experiences or seek advice in the comments below—your contributions are invaluable, and together we can enhance our understanding of this essential topic. Thank you for being a part of this conversation!
Leave a Reply