In this article, readers will discover a comprehensive overview of golf cart electrical diagnostics and effective electric cart troubleshooting methods. The content delves into common electrical issues faced by golf carts, providing practical techniques and tips to identify and resolve problems efficiently. Whether you're a novice or an experienced user, this guide aims to enhance your understanding of golf vehicle electrical repair and ensure a smoother riding experience.
Common Electrical Issues in Golf Carts
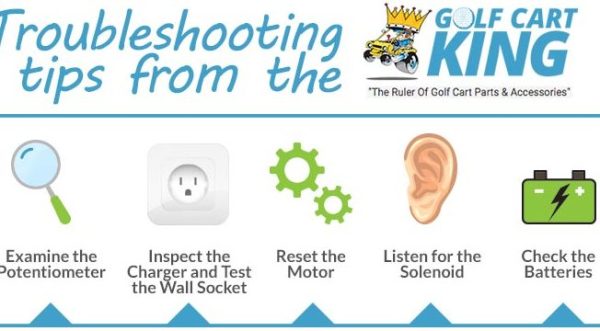
Golf carts are essential for efficient travel on the greens, but they can encounter various electrical issues that can hinder performance. Understanding these common problems can help you troubleshoot effectively and ensure your cart runs smoothly. Here are some prevalent electrical issues that golf cart owners may face:
1. Battery Problems
One of the most frequent electrical challenges in golf carts is related to the batteries. Issues can arise due to:
- Corrosion: Corroded battery terminals can lead to poor connections, affecting the cart's power supply.
- Insufficient Charge: Batteries that are not fully charged may cause sluggish performance and reduced range.
- Old Batteries: Aging batteries lose their capacity and can fail unexpectedly, requiring replacement.
2. Faulty Wiring
Wiring problems can create significant electrical disruptions. Common symptoms include:
- Frayed Wires: Damaged or frayed wiring can lead to short circuits, causing the cart to stop working altogether.
- Loose Connections: Loose or disconnected wires may prevent the cart from receiving adequate power.
- Grounding Issues: Poor grounding can lead to electrical malfunctions and erratic behavior.
3. Motor Failures
The electric motor is the heart of your golf cart's propulsion system. Common issues include:
- Overheating: Motors can overheat due to excessive load or poor ventilation, leading to a reduction in efficiency.
- Burned Out Components: Internal components may fail, causing the motor to stop functioning.
- Faulty Controllers: The controller manages the motor's speed and torque; if it fails, the cart may not operate properly.
4. Charger Malfunctions
The charger is vital for keeping your golf cart operational. Issues can include:
- Incompatibility: Using a charger that is not suited for your battery type can lead to inadequate charging.
- Faulty Charger: A malfunctioning charger can prevent the batteries from charging, leaving the cart unusable.
- Indicator Issues: If the charging indicators do not light up, it may signal a problem with the charger or the electrical system.
5. Accessory Failures
Many golf carts come equipped with accessories that can also experience electrical issues:
- Lights and Horns: Malfunctioning lights or horns may be due to blown fuses or faulty wiring.
- GPS and Bluetooth Devices: These accessories may face connectivity issues if the cart's electrical system is unstable.
- Heaters and Coolers: If these accessories are not functioning, it could be a sign of a power distribution problem.
Recognizing these common electrical issues in golf carts can empower owners to address problems quickly and efficiently. By implementing effective troubleshooting techniques, you can maintain the performance and longevity of your golf cart, ensuring a smooth ride on the course.
Step-by-Step Guide to Troubleshooting Golf Cart Batteries
If your golf cart is experiencing power issues, the problem may stem from the batteries. This guide will help you systematically identify and resolve battery-related issues to ensure optimal performance on the course.
Step 1: Safety First
Before you start troubleshooting, ensure safety by following these precautions:
- Disconnect the battery cables before inspection.
- Wear safety gloves and goggles to protect against acid spills.
- Work in a well-ventilated area to avoid inhaling harmful fumes.
Step 2: Visual Inspection
Conduct a thorough visual inspection of the batteries:
- Check for Corrosion: Look for white, ashy deposits on battery terminals, which can impede performance.
- Inspect for Damage: Look for cracks, leaks, or bulges in the battery casing.
- Examine Connections: Ensure all cable connections are tight and free from rust.
Step 3: Test Battery Voltage
To accurately assess battery health:
- Use a Multimeter: Set it to DC voltage and measure the voltage across each battery.
- Readings: A healthy battery should read around 6 volts for a standard golf cart battery. If the voltage is significantly lower, it may need charging or replacement.
Step 4: Check Specific Gravity
For flooded lead-acid batteries:
- Use a Hydrometer: This tool measures the specific gravity of the electrolyte solution.
- Interpret the Results: A reading below 1.200 indicates a weak battery that may require charging or replacement.
Step 5: Load Testing
If the battery voltage seems fine but the cart still underperforms:
- Perform a Load Test: Use a battery load tester to apply a load and measure the voltage drop.
- Assess Performance: If the voltage drops below 9.6 volts during the test, the battery may be failing.
Step 6: Charge the Batteries
If the batteries are low on charge:
- Use a Quality Charger: Ensure you are using a charger compatible with your battery type.
- Follow Charging Protocols: Charge until the batteries reach full capacity, as indicated by the charger.
Step 7: Monitor and Maintain
After troubleshooting and resolving issues, ongoing maintenance is crucial:
- Regular Checks: Inspect batteries monthly for corrosion and connections.
- Water Levels: Maintain proper water levels in flooded batteries to prevent damage.
- Keep Clean: Clean terminals and connectors regularly to ensure optimal conductivity.
Following these steps will help you effectively troubleshoot and maintain your golf cart batteries, enhancing your overall golfing experience. With proper care and attention, you can ensure your golf cart operates smoothly for many rounds to come.
Identifying Wiring Problems in Your Golf Cart
When it comes to ensuring the optimal performance of your golf cart, recognizing wiring issues is crucial. Proper wiring is the backbone of your cart's electrical system, affecting everything from battery performance to motor function. Here’s how you can effectively identify wiring problems in your golf cart.
Common Signs of Wiring Issues
Look out for these telltale signs that indicate potential wiring problems:
- Dim or Flickering Lights: If the headlights or dashboard lights appear dim or flicker, it may suggest loose connections or damaged wires.
- Unresponsive Controls: Difficulty in starting the cart or unresponsive throttle could point to faulty wiring in the ignition or controller circuit.
- Burning Smell: A burnt odor can indicate overheating wires, which poses a serious risk and should be addressed immediately.
- Corrosion: Visible corrosion on connectors or terminals can disrupt the flow of electricity, leading to performance issues.
Tools for Diagnosing Wiring Problems
Utilizing the right tools can simplify the process of diagnosing electrical issues:
- Multimeter: A multimeter is essential for measuring voltage, current, and resistance in your golf cart’s wiring.
- Wire Stripper: This tool is useful for safely removing insulation from wires when inspecting or replacing them.
- Electrical Tape: For temporary fixes, having electrical tape on hand can help secure any damaged wiring until a permanent solution is found.
Steps to Troubleshoot Wiring Problems
Follow these steps to systematically troubleshoot wiring issues in your golf cart:
1. Visual Inspection
Begin with a thorough visual inspection of all wiring. Look for frayed wires, loose connections, or signs of wear.
2. Test Connections
Using a multimeter, test the voltage at various points in the wiring circuit. This will help you identify where the power loss occurs.
3. Check for Ground Issues
A poor ground connection can cause a range of electrical problems. Ensure all ground wires are securely attached and free from corrosion.
4. Replace Damaged Wires
If you identify any damaged wires, replace them promptly. Choose wires that meet the specifications for your golf cart model to ensure safety and compatibility.
By being proactive and diligent in identifying wiring problems, you can maintain the performance and longevity of your golf cart. Regular inspections and timely repairs can save you from more significant issues down the road.
Tools Needed for Effective Golf Cart Electrical Troubleshooting
When it comes to diagnosing electrical issues in golf carts, having the right tools is essential for efficient and effective troubleshooting. This section outlines the necessary equipment to help you identify and resolve electrical problems with ease.
Essential Diagnostic Tools
To start your troubleshooting process, consider these fundamental diagnostic tools:
- Multimeter: A versatile device that measures voltage, current, and resistance. This tool is crucial for checking the integrity of electrical connections and ensuring that components are functioning correctly. A quality multimeter can range from $20 to $100.
- Wire Strippers: Essential for preparing wires for connections, wire strippers allow you to remove insulation without damaging the wire itself. Look for models priced around $10 to $30.
- Circuit Tester: A simple tool used to check for power in circuits. This handy device can help you quickly identify faulty wiring or blown fuses, typically costing between $5 and $20.
Specialized Equipment for Advanced Troubleshooting
For more complex issues, consider investing in specialized tools that can provide deeper insights into your golf cart’s electrical system:
- Battery Load Tester: This tool evaluates the health of your golf cart's batteries under load conditions. It helps determine whether a battery is capable of holding a charge. Prices generally range from $30 to $80.
- Oscilloscope: Although more advanced, an oscilloscope can analyze the waveform of electrical signals, which is beneficial for diagnosing issues with electronic components. Expect to pay between $100 and $500 for a quality unit.
Basic Hand Tools
In addition to diagnostic tools, basic hand tools are crucial for performing repairs:
- Screwdrivers: A set of both flathead and Phillips screwdrivers will assist in accessing various components within the golf cart.
- Wrenches and Sockets: These tools are necessary for loosening and tightening bolts, especially when working on battery terminals or securing electrical components.
- Heat Gun or Soldering Iron: Useful for repairing or connecting wires, these tools allow for proper insulation and secure connections.
Safety Equipment
Don’t overlook safety when performing electrical troubleshooting:
- Safety Goggles: Protect your eyes from potential sparks or debris.
- Insulated Gloves: These gloves are essential for handling live wires safely.
Equipping yourself with these tools will significantly enhance your ability to troubleshoot electrical issues in golf carts. By having the right equipment on hand, you can effectively carry out the essential guide to golf cart electrical troubleshooting techniques, ensuring a smooth and safe ride.
When to Seek Professional Help for Golf Cart Electrical Repairs
Determining when to consult a professional for golf cart electrical repairs is crucial to ensure safety and optimal performance. Electrical issues can often be complex, and recognizing the signs that indicate the need for expert assistance can save you time and money.
Signs You Need Professional Assistance
Look out for the following indicators that it may be time to call in an expert:
- Persistent Electrical Problems: If you experience recurring issues, such as the cart not starting or intermittent power loss, professional diagnostics may be necessary.
- Burning Smells or Visible Damage: Any signs of burning odors or physical damage to wiring and components should prompt immediate professional evaluation to prevent further hazards.
- Battery Issues: If your golf cart batteries are not holding a charge, or if there is corrosion on terminals, it's wise to consult a technician for a thorough inspection.
- Unusual Noises: Strange sounds during operation can indicate electrical malfunctions that require expert analysis.
Complex Electrical Systems
Modern golf carts often feature sophisticated electrical systems, including advanced controllers and regenerative braking. If you encounter problems related to these systems, consider seeking professional help:
- Controller Malfunctions: Issues with the speed controller can affect performance and safety, necessitating a specialist’s attention.
- Regenerative Braking Problems: If the regenerative braking system is not functioning correctly, it could lead to reduced efficiency and safety risks.

DIY vs. Professional Repair
While some minor repairs can be managed independently, understanding your limits is essential. If you feel unsure or lack the necessary tools, it’s best to leave the job to a trained technician. Professional mechanics can provide:
- Expert Diagnosis: A qualified technician can quickly identify issues that may be overlooked by the untrained eye.
- Access to Specialized Tools: Many electrical repairs require specific equipment that may not be readily available to the average golf cart owner.
- Warranty Considerations: Professional repairs may be necessary to maintain warranties on your golf cart, particularly for complex electrical systems.
Recognizing when to reach out for professional help can make a significant difference in the longevity and safety of your golf cart. If you experience any of the aforementioned issues, don’t hesitate to contact a qualified technician to ensure your cart operates smoothly and safely.
We truly value your insights and experiences, and we invite you to share your thoughts or any questions you may have about Golf Cart Electrical Troubleshooting in the comments below. Your contributions not only enrich our community but also help fellow enthusiasts navigate their own challenges. Together, we can foster a supportive environment where everyone can learn and grow. We look forward to hearing from you!
Leave a Reply