
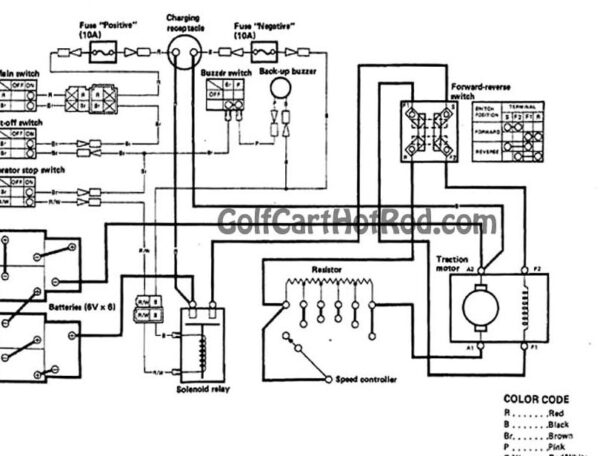
This article provides an in-depth electric circuit guide for golf carts, detailing essential information for effective repairs and maintenance. Readers will discover step-by-step instructions, troubleshooting tips, and valuable insights into the components of a golf cart wiring manual, ensuring a comprehensive understanding of the electrical systems involved. With this golf cart electrical system blueprint, you'll be well-equipped to tackle any wiring issues that may arise.
Understanding Golf Cart Electrical Systems
Golf carts are increasingly popular for both recreational and utility purposes, making it essential for users to grasp the fundamentals of their electrical systems. Understanding these systems can enhance performance and ensure longevity, making it a valuable skill for any golf cart owner.
The Basics of Golf Cart Electrical Systems
At the heart of every golf cart's functionality is its electrical system, which primarily consists of:
- Batteries: Typically, golf carts are powered by either lead-acid or lithium-ion batteries. Lead-acid batteries are more traditional and cost-effective, usually priced between $800 and $1,200 for a set of six. Lithium-ion batteries, while more expensive at around $2,000 to $3,000, offer longer life and reduced maintenance.
- Controller: This component regulates the power flow from the batteries to the motor, ensuring optimal performance. Depending on the model, controllers can range from $200 to $800.
- Motor: The motor is responsible for converting electrical energy into mechanical energy to propel the cart. Electric motors typically cost between $300 and $600.
- Wiring Harness: The wiring connects all electrical components, and maintaining it is crucial for preventing short circuits and ensuring efficiency.
Common Issues in Golf Cart Electrical Systems
Identifying issues early can save time and repair costs. Here are some typical problems that may arise:
- Battery Drain: This can occur due to improper charging practices or old batteries. Regularly check battery health and charge levels.
- Faulty Connections: Loose or corroded connections can lead to intermittent power loss. Inspect connections regularly for signs of wear.
- Controller Malfunctions: If the cart does not respond to acceleration, the controller may be at fault. Replacement can often resolve the issue.
Maintaining Your Golf Cart Electrical System
To ensure your golf cart operates smoothly, consider these maintenance tips:
- Regular Inspections: Schedule routine checks on batteries, wiring, and connectors to identify issues before they escalate.
- Proper Charging: Use the correct charger and avoid overcharging to extend battery life.
- Clean Connections: Regularly clean terminals and connections to prevent corrosion, which can impede performance.
Upgrading Your Golf Cart Electrical Components
Upgrading specific components can significantly enhance your golf cart's performance. Consider the following options:
- High-Performance Batteries: Switching to lithium-ion batteries can improve range and reduce weight.
- Upgraded Controllers: A high-performance controller can provide better acceleration and efficiency.
- Enhanced Motors: Investing in a more powerful motor can increase speed and torque, especially for utility carts.
By understanding the intricacies of golf cart electrical systems, owners can effectively troubleshoot issues and perform necessary maintenance. This knowledge is essential for maximizing the lifespan and functionality of your golf cart, making it a valuable addition to your skills as an owner.
Common Electrical Issues in Golf Carts and Their Solutions
Golf carts are essential for navigating golf courses and other terrains, but like any vehicle, they can encounter electrical issues. Understanding these common problems and their solutions can help you maintain optimal performance. Below are some prevalent electrical issues faced by golf cart owners, along with practical solutions to address them.
1. Battery Drain
One of the most frequent electrical problems is battery drain. This can occur due to several reasons:
- Old or Damaged Batteries: Over time, batteries lose their ability to hold a charge.
- Improper Charging: Not using the correct charger can lead to battery failure.
- Parasitic Draw: Accessories like lights or radios can draw power even when the cart is off.
Solution:
- Regularly check battery voltage and replace old batteries.
- Use a compatible charger and avoid overcharging.
- Disconnect non-essential accessories when the cart is not in use.
2. Faulty Wiring Connections
Wiring issues can lead to various problems, including loss of power or intermittent electrical failures. Common causes include:
- Corrosion: Moisture can cause corrosion at connection points.
- Loose Connections: Vibration from driving can loosen wires over time.
- Wear and Tear: Insulation can deteriorate, leading to shorts.
Solution:
- Inspect wiring for signs of corrosion or wear and clean or replace as necessary.
- Tighten loose connections to ensure a secure fit.
- Regularly conduct a thorough inspection of the wiring to identify potential issues early.
3. Motor Malfunctions
The electric motor is crucial for the operation of your golf cart. Issues can arise from:
- Overheating: Continuous use without adequate breaks can cause overheating.
- Faulty Controllers: The controller regulates power to the motor and can fail.
- Worn Brushes: Brushes in the motor can wear out, affecting performance.
Solution:
- Allow the motor to cool down during extended use.
- Test the controller with a multimeter and replace if faulty.
- Inspect and replace worn brushes to maintain motor efficiency.
4. Lighting Issues
Golf cart lighting problems can affect visibility and safety. Common lighting issues include:
- Burnt-Out Bulbs: Regular use can lead to burnt-out bulbs.
- Wiring Problems: Damaged wiring can disrupt power to lights.
- Faulty Switches: Switches can wear out and fail to operate correctly.
Solution:
- Replace burnt-out bulbs promptly with the correct type.
- Check the wiring leading to the lights for any signs of damage.
- Test and replace faulty switches to ensure proper functionality.
By being aware of these common electrical issues and their respective solutions, you can effectively maintain your golf cart's performance. For more detailed guidance, consider referring to the Comprehensive Golf Cart Electrical Wiring Guide for Easy Repairs and Maintenance, which provides further insights into troubleshooting and repair techniques.
Step-by-Step Guide to Wiring Your Golf Cart
Wiring your golf cart can seem daunting, but with a clear and structured approach, you can ensure a safe and effective electrical setup. This step-by-step guide will provide you with essential insights into the wiring process, making it easier for you to manage repairs and maintenance effectively.
1. Gather Necessary Tools and Materials
Before starting, ensure you have the following tools and materials at hand:
- Wire Strippers: For stripping insulation from wires.
- Screwdrivers: Both flathead and Phillips for securing connections.
- Wrenches: To tighten battery terminals.
- Multimeter: To check voltage and continuity.
- Electrical Tape: For insulating connections.
- Heat Shrink Tubing: To protect splices and connections.
2. Disconnect the Battery
Safety is paramount when working with electrical systems. Begin by disconnecting the battery:
- Locate the battery compartment.
- Use a wrench to remove the negative (-) terminal first, followed by the positive (+) terminal.
This prevents any accidental short circuits while you work.
3. Understand the Wiring Layout
Before making any changes, familiarize yourself with the wiring diagram specific to your golf cart model. Key components to identify include:
- Controller: Manages power flow from the battery to the motor.
- Motor: Converts electrical energy into mechanical energy.
- Battery Pack: Supplies the power needed for operation.
Reviewing this layout helps you understand how the components interact.
4. Inspect Existing Wiring
Carefully examine the existing wiring for any signs of wear or damage. Look for:
- Frayed or exposed wires.
- Corrosion at terminals.
- Loose connections.
Addressing these issues before proceeding will enhance safety and performance.
5. Replacing or Adding Wires
If you need to replace or add wires, follow these steps:
5.1 Cutting and Stripping Wires
Use wire cutters to cut the wire to the desired length, then strip about ½ inch of insulation from each end.
5.2 Making Connections
Use either crimp connectors or soldering for secure connections. Ensure that:
- Connections are tight and free from corrosion.
- Use heat shrink tubing to insulate any soldered connections.
6. Reconnect the Battery
Once all wiring is complete, reconnect the battery:
- Attach the positive (+) terminal first.
- Follow with the negative (-) terminal.
Ensure that all connections are secure to avoid any electrical failures.
7. Testing the System
Before taking your golf cart for a ride, conduct a thorough test:
- Use a multimeter to check voltage levels.
- Ensure the motor engages when the accelerator is pressed.
- Check for any unusual sounds or smells that could indicate a problem.
This step is crucial to confirm that your golf cart is functioning safely and effectively.
By following this detailed step-by-step guide, you will gain confidence in wiring your golf cart, allowing for easier repairs and maintenance in the future.
Essential Tools for Golf Cart Electrical Repairs
When tackling electrical repairs on your golf cart, having the right tools is crucial for ensuring safety and efficiency. This guide outlines the essential tools you will need to perform effective repairs and maintenance on your golf cart's electrical system.
Basic Hand Tools
Utilizing basic hand tools can make a significant difference in the ease of your electrical repairs. Here are some of the most important:
- Screwdrivers: A set of both flathead and Phillips screwdrivers is essential for removing and securing components.
- Wrenches: A combination of metric and standard wrenches will help you work on various fittings and connections.
- Pliers: Needle-nose and wire-cutting pliers are necessary for gripping, twisting, and cutting wires.
Electrical Testing Equipment
To accurately diagnose electrical issues, you’ll need testing equipment that can help identify problems efficiently:
- Multimeter: This device measures voltage, current, and resistance, providing crucial data to troubleshoot electrical circuits. A reliable model can be found for around $20 to $50.
- Continuity Tester: Useful for checking the integrity of wires and connections, ensuring that current can flow as intended.
- Battery Tester: This tool helps assess the condition of your golf cart's battery, determining if it needs replacement or charging.
Specialized Tools
For more advanced repairs, certain specialized tools can enhance your efficiency:
- Wire Strippers: Essential for safely removing insulation from wires without damaging the conductors, ensuring a secure connection.
- Crimping Tool: Used for attaching connectors to wires, ensuring a strong and reliable electrical connection.
- Soldering Iron: Ideal for making permanent connections between wires, providing durability and reliability in repairs.
Safety Equipment
Safety should always be a priority during electrical repairs. Consider equipping yourself with the following:
- Insulated Gloves: Protect your hands from electric shock while working on live circuits.
- Safety Glasses: Safeguard your eyes from debris and accidental sparks during repairs.
- Fire Extinguisher: Always have a fire extinguisher nearby, particularly one rated for electrical fires.
Organizational Tools
Keeping your workspace organized can streamline the repair process:
- Toolbox: A sturdy toolbox will help you store and transport your tools easily.
- Wire Organizer: Use a wire organizer to keep various wires and connectors sorted and accessible.
- Label Maker: Labeling wires and components can save time and prevent confusion during repairs.
With these essential tools, you’ll be well-equipped to handle golf cart electrical repairs efficiently. Having the right equipment not only facilitates easier maintenance but also enhances your overall understanding of the electrical systems within your golf cart. Whether you’re referring to a Comprehensive Golf Cart Electrical Wiring Guide for Easy Repairs and Maintenance or tackling repairs on your own, these tools are invaluable for any golf cart owner.
Safety Tips for Working with Golf Cart Electrical Wiring
When working with golf cart electrical wiring, ensuring your safety is paramount. Adhering to specific guidelines can help you avoid accidents and maintain the integrity of your cart's electrical system. Here are some essential safety tips to consider:
1. Disconnect the Battery
Before starting any work on your golf cart’s electrical wiring, it’s crucial to disconnect the battery. This prevents any accidental shocks or shorts while you are handling the wiring. Always remove the negative terminal first, followed by the positive terminal.
2. Use Proper Tools
Employing the right tools is essential for both safety and efficiency. Here’s a list of tools you should have on hand:
- Insulated Wire Strippers - Prevents accidental shocks.
- Multimeter - Helps in diagnosing electrical issues.
- Screwdrivers - Ensure they have insulated handles.
- Heat Shrink Tubing - For secure and insulated connections.
3. Wear Protective Gear
Always wear appropriate protective gear to minimize risks. This includes:
- Safety Glasses - Protect your eyes from debris.
- Gloves - Insulated gloves are best for electrical work.
- Non-slip Shoes - Helps prevent slips while working.
4. Work in a Well-Ventilated Area
Ensure that you are working in a well-ventilated space, especially if you are using chemicals or materials that can emit fumes. Adequate airflow reduces the risk of inhaling harmful substances.
5. Avoid Working on Wet Surfaces
Electricity and water do not mix. Make sure that your work area is dry, and avoid working on your golf cart’s electrical wiring if it has recently rained or if there is moisture present.
6. Familiarize Yourself with the Wiring Diagram
Before starting any repairs, take the time to familiarize yourself with your golf cart’s wiring diagram. Understanding the layout will help you avoid mistakes and identify the correct components for repairs.
7. Label Wires and Connections
If you are disconnecting multiple wires, use labels to mark each one. This practice will make reassembly much easier and help prevent confusion when reconnecting wires.

8. Test After Repairs
Once your repairs are complete, it’s important to test the system before fully reassembling everything. Use a multimeter to check for any issues and ensure all connections are secure.
By following these safety tips while working with golf cart electrical wiring, you can significantly reduce the risk of accidents and ensure a smooth repair process. For more detailed guidance, consider consulting a comprehensive golf cart electrical wiring guide, which can provide further insights into effective maintenance and troubleshooting.
We value your insights and experiences, and we invite you to share your thoughts or questions about the Golf Cart Electrical Wiring Guide in the comments section below. Your contributions not only enrich our community but also help fellow enthusiasts navigate their own projects with confidence. Whether you have tips to offer or seek clarification on specific topics, we’re here to engage in a constructive dialogue. Let’s learn and grow together!
Leave a Reply