This article explores essential techniques for achieving optimal visibility through golf cart headlight alignment. Readers will discover step-by-step instructions and helpful tips for effective cart lighting calibration, ensuring that their headlights provide maximum illumination during nighttime rides. Whether you’re a novice or experienced user, understanding the nuances of golf cart illumination optimization will enhance your overall driving experience.
Understanding the Importance of Proper Golf Cart Headlight Adjustment
Properly adjusting the headlights on your golf cart is crucial for both safety and functionality. This process ensures that you have optimal visibility during evening rounds or early morning tee times, reducing the risk of accidents and improving your overall experience on the course.
Why Headlight Adjustment Matters
Adjusting your golf cart headlights can significantly enhance your ability to see and be seen. Here are some key reasons why this adjustment is essential:
- Enhanced Visibility: Well-aligned headlights illuminate the path ahead, allowing you to spot hazards and obstacles in a timely manner.
- Safety for All: Properly aimed lights not only help you navigate but also ensure that other golfers and pedestrians can see your cart, minimizing the risk of collisions.
- Prolonged Headlight Life: Incorrectly aimed headlights can cause unnecessary wear and tear on the bulbs, leading to more frequent replacements and added costs.
Common Headlight Adjustment Issues
Many golf cart owners overlook the importance of headlight alignment, leading to several common problems:
- Overly Bright Lights: If headlights are too high, they can blind oncoming traffic, creating a hazardous environment.
- Dim Lights: Low headlights may not provide adequate illumination, making it difficult to see the path clearly.
- Uneven Lighting: Misalignment can cause uneven light distribution, leading to dark spots and reduced visibility.
How to Assess Headlight Alignment
To ensure your golf cart headlights are properly adjusted, consider the following steps:
1. Position Your Cart: Park your golf cart on a flat surface facing a wall or garage door, about 10 to 15 feet away.
2. Mark the Centerline: Use tape or chalk to mark where the center of the headlights hits the wall.
3. Check the Beam Height: The top of the beam should ideally hit just below the centerline mark, providing optimal illumination without blinding others.
4. Make Adjustments: Most golf carts come with adjustment screws near the headlight housing. Turn these screws to raise or lower the headlights as needed.
By regularly checking and adjusting your golf cart headlights, you can ensure a safer ride while enjoying your time on the course. Proper headlight adjustment not only enhances visibility but also contributes to a more enjoyable golfing experience.
Step-by-Step Guide to Adjusting Your Golf Cart Headlights
Adjusting the headlights on your golf cart is essential for ensuring optimal visibility during evening rides or in low-light conditions. Properly aligned headlights enhance safety and improve the overall driving experience. Follow this detailed guide to learn how to adjust your golf cart headlights effectively.
Tools You Will Need
Before you begin the adjustment process, gather the following tools:
- Screwdriver: A flathead or Phillips screwdriver, depending on your golf cart model.
- Measuring Tape: To ensure precise alignment.
- Level Surface: A flat area where you can park your golf cart.
- Helper: Someone to assist you in checking the alignment.
Preparation Steps
1. Park Your Golf Cart: Ensure your golf cart is on a level surface approximately 10-15 feet away from a wall or garage door. This distance allows for accurate measurements when adjusting the headlights.
2. Turn on the Headlights: Switch on the headlights to see the beam pattern clearly.
Adjusting the Headlight Alignment
Follow these steps to adjust the headlight angle:
1. Check the Beam Height
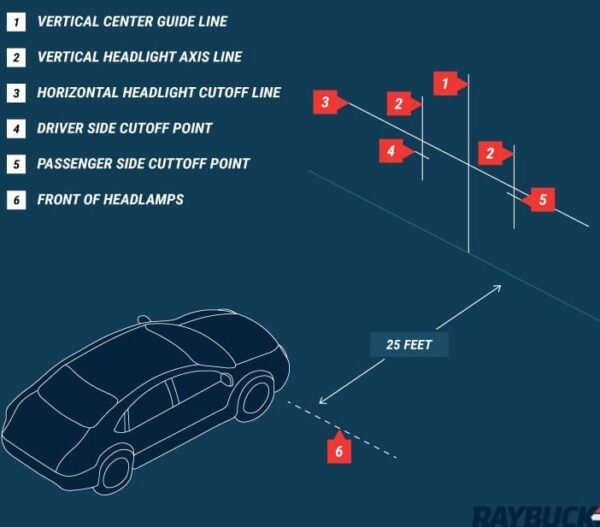
- The center of the headlight beam should be about 2-4 inches below the center of the headlights at the distance you parked your cart. Measure the height from the ground to the center of the headlight, then mark this height on the wall.
2. Determine the Horizontal Alignment
- The beams should be aimed straight ahead. Observe the light pattern on the wall; there should be a clear cutoff line with no light spilling to the left or right.
3. Adjust the Vertical Angle
- Locate the adjustment screws on your golf cart's headlights. These are usually found on the back or side of the headlight housing.
- Use the screwdriver to turn the screws:
- Clockwise to raise the beam.
- Counterclockwise to lower the beam.
4. Adjust the Horizontal Angle
- If the light pattern shows that the beams are aimed too far left or right, adjust the horizontal alignment using the appropriate screw.
- Again, turn the screw clockwise or counterclockwise as needed to align the beams properly.
Final Checks
After making the adjustments, conduct a final inspection:
- Test the Alignment: Take your golf cart for a short drive in a dimly lit area to ensure the headlights provide adequate illumination and do not blind oncoming traffic.
- Reassess as Necessary: If you notice any issues with visibility, repeat the adjustment process.
Maintaining the proper alignment of your golf cart headlights not only enhances safety but also improves the overall functionality of your vehicle during nighttime excursions. Regular checks and adjustments can help ensure your headlights remain effective over time.
Common Issues Caused by Misaligned Golf Cart Headlights
Misaligned headlights on golf carts can lead to several problems that affect safety and visibility during operation. Understanding these issues is essential for maintaining a safe driving experience.
Poor Visibility
When golf cart headlights are misaligned, they may not illuminate the intended area effectively. This can result in:
- Inadequate Lighting: The headlights might focus on the ground too low or too high, leaving critical areas dark.
- Glare for Other Drivers: Improperly aimed lights can blind oncoming traffic, increasing the risk of accidents.
Increased Risk of Accidents
Misaligned headlights can significantly elevate the chances of collisions. This risk stems from:
- Inability to Spot Obstacles: Misalignment can prevent drivers from seeing hazards like potholes, curbs, or pedestrians.
- Delayed Reaction Time: Reduced visibility may lead to slower responses to unexpected situations, making accidents more likely.
Shortened Headlight Lifespan
Improper alignment can also impact the longevity of your golf cart's headlights. Factors contributing to this issue include:
- Excessive Heat: Misaligned headlights can create uneven heat distribution, leading to premature bulb failure.
- Increased Energy Consumption: Struggling to provide adequate light may cause bulbs to work harder, resulting in a shorter lifespan.
Legal and Compliance Issues
In some areas, improperly aligned headlights may violate local regulations. This can result in:
- Fines: Law enforcement may issue citations for non-compliance with lighting regulations.
- Increased Liability: If an accident occurs due to misaligned headlights, liability may fall on the driver for not maintaining their vehicle.
By addressing these common issues, you can enhance the safety and functionality of your golf cart. Ensuring proper alignment of your headlights is a crucial step in achieving optimal visibility and a safer driving experience.
Tools Required for Golf Cart Headlight Adjustment
When it comes to achieving optimal visibility on the golf course or during nighttime drives, having the right tools for golf cart headlight adjustment is essential. Below is a list of necessary tools to help you adjust your headlights effectively and ensure a safe driving experience.
Essential Tools
- Phillips Screwdriver: A standard Phillips screwdriver is crucial for loosening or tightening the screws that hold the headlight assembly in place. This tool is commonly found in most households and is easy to use.
- Flathead Screwdriver: Depending on your golf cart model, a flathead screwdriver may be needed for specific adjustments or to remove covers protecting the headlight screws.
- Adjustable Wrench: An adjustable wrench is helpful for any nuts or bolts that may need to be tightened or adjusted during the headlight setup process.
- Measuring Tape: To properly adjust your headlights, you will need a measuring tape to ensure they are positioned at the correct height and angle, providing optimal visibility.
- Level Tool: A level tool can help you ensure that the headlights are aligned horizontally, which is crucial for effective illumination on the road.
Additional Helpful Tools
- Safety Goggles: Protect your eyes while working on your golf cart, especially when dealing with any electrical components or during headlight removal.
- Work Gloves: Wearing gloves can provide a better grip and protect your hands from sharp edges or debris while working on the headlight assembly.
- Flashlight: If you're adjusting headlights in low-light conditions, a flashlight can be invaluable for illuminating your work area and ensuring accurate adjustments.
Optional Tools
- Digital Multimeter: If you suspect electrical issues with your headlights, a digital multimeter can help diagnose voltage and current problems.
- Socket Set: For certain golf cart models, a socket set may be necessary to access and adjust the headlight components more efficiently.
Having these tools at your disposal will not only facilitate the headlight adjustment process but also ensure that your golf cart remains roadworthy and safe for nighttime navigation.
Maintaining Your Golf Cart Headlights for Optimal Performance
To ensure your golf cart headlights provide maximum visibility and safety, regular maintenance is essential. Here are several effective strategies to keep your headlights in top shape.
Regular Inspection
Conduct a thorough inspection of your headlights at least once a month. Look for the following:
- Cracks or Damage: Inspect the lens for any signs of cracks or chips that could affect light output.
- Bulb Condition: Check if the bulbs are functioning correctly and replace any burnt-out bulbs promptly.
- Wiring Issues: Examine the wiring for any frays or corrosion that could lead to electrical failures.
Cleaning the Headlights
Dirt and grime can significantly reduce the effectiveness of your golf cart headlights. To clean them:
- Use a Soft Cloth: Gently wipe the lens with a microfiber cloth to remove surface dirt.
- Headlight Cleaner: For stubborn stains, apply a headlight restoration product designed to restore clarity.
DIY Cleaning Solution
If you prefer a homemade solution, mix equal parts of baking soda and water to create a paste. Apply it to the headlights, scrub gently, and rinse with water for a sparkling finish.
Adjusting Headlight Aim
Proper alignment of your headlights is crucial for optimal visibility. Here’s how to adjust them:
1. Park on Level Ground: Ensure your golf cart is on a flat surface about 25 feet away from a wall.
2. Mark the Beam Height: Turn on your headlights and mark the center of the light beam on the wall with tape.
3. Adjust the Aim: Use the adjustment screws located near the headlight housing to align the beams so that they shine slightly downward.
Choosing the Right Bulbs
Upgrading to high-quality bulbs can enhance visibility. Consider options such as:
- LED Bulbs: They last longer and consume less power, making them an excellent choice for energy efficiency.
- Halogen Bulbs: These provide a bright, white light and are often more affordable than LEDs.
The average price for LED bulbs ranges from $20 to $50, while halogen options typically cost between $10 and $25.

Protecting Your Headlights
To prolong the life of your headlights, consider applying a protective film or using headlight covers. These can shield against UV rays, debris, and weather conditions.
By incorporating these maintenance practices, you can ensure that your golf cart headlights remain effective, providing you with safe and enjoyable rides, especially during evening outings or in low-light conditions.
We'd love to hear your thoughts and questions about Golf Cart Headlight Adjustment! Your insights and experiences can greatly enrich our community’s understanding of this important topic. Whether you have tips to share or inquiries that need answering, please feel free to leave a comment below. Together, we can illuminate the path to better golf cart safety and performance!
Leave a Reply