This article explores essential golf cart illumination enhancements designed to improve both safety and aesthetics. Readers will discover various golf cart lighting modifications that not only boost visibility during nighttime rides but also add a stylish touch to their vehicles. From LED options to upgraded headlights, this guide covers the best golf cart light system improvements to consider for a safer and more visually appealing driving experience.
Benefits of Upgrading Your Golf Cart Lighting System
Upgrading your golf cart lighting system is not just about aesthetics; it plays a crucial role in enhancing both safety and functionality. Here are several compelling reasons to consider making this upgrade.
Enhanced Visibility and Safety
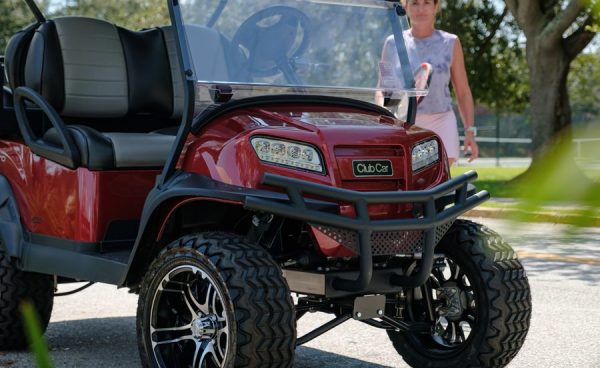
One of the primary advantages of a modern golf cart lighting system is improved visibility. Upgrading to LED headlights and taillights can significantly brighten your path, making it easier to navigate in low-light conditions. This is especially important during early morning or late evening rounds of golf.
- LED Headlights: Provide clearer illumination compared to standard bulbs, helping you spot hazards sooner.
- Brake Lights: Bright and quick-responding brake lights alert other drivers, reducing the risk of rear-end collisions.
- Turn Signals: Adding turn signals enhances communication with pedestrians and other vehicles on the course.
Energy Efficiency
Modern lighting systems, particularly those using LED technology, are designed to consume less power than traditional incandescent bulbs. This efficiency not only prolongs battery life but also reduces the frequency of recharges, allowing you to enjoy longer rounds without interruptions.
- Lower Power Consumption: LEDs use up to 80% less energy than incandescent bulbs.
- Longer Lifespan: LEDs can last up to 25,000 hours, meaning fewer replacements and lower maintenance costs.
Customization and Style
Upgrading your golf cart lighting system allows for greater personalization. With a variety of colors and designs available, you can customize your lighting to reflect your personality or match your cart’s exterior. Options such as colored underglow lights can add a unique flair, making your golf cart stand out on the course.
- Color Options: Choose from a range of colors for both headlights and interior lighting.
- Stylish Designs: Sleek, modern fixtures can enhance the overall look of your cart.
Increased Resale Value
Investing in a high-quality lighting upgrade can increase the resale value of your golf cart. Prospective buyers often look for enhanced safety features and modern aesthetics. A well-lit cart equipped with the latest lighting technology can make a strong impression, making your cart more appealing in a competitive market.
- Attractive Features: Advanced lighting systems are seen as desirable upgrades.
- Market Appeal: A visually appealing cart with updated features can attract more potential buyers.
Upgrading your golf cart lighting system is a multifaceted investment that offers numerous benefits. From improved safety and energy efficiency to customization options and increased resale value, these upgrades enhance your overall golfing experience while ensuring you are visible and safe on the course.
Types of Lighting Options for Golf Cart Upgrades
Upgrading the lighting system on your golf cart can significantly enhance both safety and style. With various options available, it’s essential to choose the right type that meets your needs. Below, we explore several distinct lighting choices that can elevate your golf cart experience.
1. LED Headlights
LED headlights are a popular choice among golf cart owners due to their energy efficiency and longevity. They provide bright illumination, ensuring clear visibility during nighttime rides or in low-light conditions.
- Durability: LED lights are resistant to shocks and vibrations, making them ideal for rugged terrains.
- Low Power Consumption: They consume significantly less power than traditional bulbs, extending battery life.
- Variety: Available in various designs and brightness levels to suit different styles.
2. Tail Lights
Adding tail lights to your golf cart is crucial for safety, especially when driving in crowded areas or on public roads. They signal your presence to others and improve visibility from behind.
- Red LED Tail Lights: Commonly used for their visibility and compliance with traffic regulations.
- Integrated Brake Lights: Some models come with built-in brake lights that illuminate when you slow down.
3. Underbody Lighting
Underbody lighting can add a unique aesthetic to your golf cart, making it stand out in a crowd. This type of lighting often features color-changing LED strips that can be customized for various occasions.
- Atmospheric Effects: Great for nighttime events or gatherings, creating a vibrant ambiance.
- Customization: Many underbody kits allow you to choose colors and patterns, enhancing your cart's personality.
4. Dome Lights
Dome lights are perfect for illuminating the interior of your golf cart. They provide essential lighting for passengers getting in and out, enhancing comfort and safety.
- Easy Installation: Most dome lights can be easily mounted and wired with minimal tools.
- Soft Glow Options: Many models offer soft lighting to avoid harsh glares, making them suitable for evening rides.
5. Fog Lights
Fog lights can be an excellent addition for those who frequently navigate through foggy or rainy conditions. They are designed to cut through the mist, providing better visibility.
- Wider Beam: Fog lights emit a broader and lower beam of light, illuminating the road immediately in front of the cart.
- Improved Safety: Enhances your ability to see and be seen in adverse weather conditions.
By carefully considering these diverse lighting options, you can upgrade your golf cart's lighting system, ensuring both enhanced safety and a stylish appearance. Each lighting type serves a unique purpose, making it easier to find the perfect fit for your specific needs and preferences.
How to Choose the Right Golf Cart Lighting System for Your Needs
Selecting the ideal lighting system for your golf cart is crucial for enhancing visibility, safety, and style. Here are some key considerations to guide your decision-making process.
Assess Your Lighting Needs
Before purchasing a lighting system, evaluate the specific requirements based on your golf cart usage:
- Nighttime Use: If you frequently play at dusk or in low-light conditions, consider brighter options like LED headlights.
- Street Legal: Check local regulations if you plan to use your cart on public roads. Some areas require specific lighting configurations.
- Ambiance: If you enjoy social outings, ambient lighting features can enhance your cart's aesthetic appeal.
Types of Golf Cart Lighting Systems
Understanding the different types of lighting systems can help narrow down your options:
- LED Lights: Energy-efficient and long-lasting, these lights provide excellent brightness and are often available in various colors.
- Halogen Lights: These lights are typically brighter than standard bulbs but consume more energy and have a shorter lifespan.
- Light Bars: Ideal for those who need extended visibility, light bars can be mounted on the roof or front of the cart.
Evaluate Power Options
The power source of your lighting system can impact both performance and installation:
- Battery-Powered: Convenient for quick installations, battery-powered systems may require regular battery changes.
- Wired Systems: These systems connect directly to your cart’s electrical system, offering consistent power but may need professional installation.
Consider Installation Requirements
Assess your comfort level with installation:
- DIY Kits: Many lighting systems come with easy-to-follow instructions for those who prefer a hands-on approach.
- Professional Installation: If you're uncertain about installation, hiring a professional can ensure safety and proper functionality.
Budget and Quality
Investing in a quality lighting system can save you money in the long run:
- Price Range: Basic LED kits can start around $50, while more advanced systems with features like turn signals may range from $100 to $300.
- Brand Reputation: Opt for reputable brands known for durability and performance, such as Golfer's Choice or Golf Cart King.
By carefully considering your specific needs and the various options available, you can choose a golf cart lighting system that not only enhances safety but also adds a touch of style to your ride.
Step-by-Step Guide to Installing Golf Cart Lighting Upgrades
Upgrading the lighting system on your golf cart not only enhances its appearance but also significantly improves safety during evening rounds or nighttime events. This guide will provide you with a detailed, step-by-step approach to installing essential golf cart lighting system upgrades for enhanced safety and style.
Gathering Your Tools and Materials
Before you begin the installation process, it’s important to have all necessary tools and materials ready. Here’s what you’ll need:
- LED Headlights - Choose high-quality, weather-resistant options (average price: $50-$100).
- Tail Lights - Opt for models with built-in turn signals (average price: $30-$70).
- Wiring Kit - A complete kit that includes connectors and fuses (average price: $20-$40).
- Switches - For controlling your lights, consider illuminated toggle switches (average price: $10-$25).
- Basic Tools - Screwdrivers, wire strippers, electrical tape, and a drill.
Step 1: Safety First
Before starting any electrical work, ensure the golf cart is turned off and the key is removed. Disconnect the battery to prevent any accidental short circuits.
Step 2: Installing the Headlights
1. Remove the Existing Headlights: Use a screwdriver to detach the old headlights from their housing.
2. Prepare the New Headlights: Connect the wiring harness to your new LED headlights. Ensure all connections are secure.
3. Mount the New Headlights: Position the new headlights in the designated area and fasten them using screws provided in the kit.
Wiring the Headlights
- Connect the positive wire from the headlight to the positive terminal on the battery.
- Connect the negative wire to a suitable grounding point on the golf cart.
Step 3: Installing Tail Lights
1. Remove Old Tail Lights: Similar to the headlights, unscrew and detach the existing tail lights.
2. Connect New Tail Lights: Attach the wiring harness to the new tail lights, ensuring proper alignment.
3. Secure the Tail Lights: Mount the tail lights using screws, making sure they are positioned for optimal visibility.
Wiring the Tail Lights
- Connect the positive wire to the same power source as the headlights.
- Attach the negative wire to the golf cart's grounding point.
Step 4: Adding Switches
1. Choose a Location: Select a convenient spot on the dashboard for the light switches.
2. Drill Holes: Use a drill to create holes for the switches.
3. Connect the Switches: Wire the switches according to the manufacturer’s instructions, linking them to the headlights and tail lights.
Step 5: Testing the System
Once everything is installed, reconnect the battery and test all lights:
- Turn on the headlights and check for brightness and alignment.
- Activate the tail lights, ensuring they function properly with brake and turn signal operations.
Step 6: Final Touches
- Use electrical tape to secure any exposed wiring and prevent damage.
- Ensure all components are tightly secured and free from any obstructions.
With these steps, you can successfully install lighting upgrades on your golf cart, enhancing both its functionality and style for safer nighttime use. Enjoy your upgraded golf cart and the added visibility it brings to your game!
Maintaining Your Golf Cart's Lighting System for Longevity
Proper maintenance of your golf cart's lighting system is crucial for ensuring safety and enhancing your overall golfing experience. By regularly attending to the various components of your lighting system, you can extend its lifespan and maintain optimal functionality.
Regular Inspection of Lights
To keep your lighting system in peak condition, conduct routine inspections. Check for:
- Burnt-out bulbs: Replace any that are dim or non-functional to maintain visibility.
- Corrosion: Examine connections and terminals for signs of rust or wear.
- Alignment: Ensure that headlights and tail lights are correctly positioned for maximum effectiveness.
Cleaning the Lighting Components
Dirt and grime can accumulate on your golf cart's lights, reducing their brightness. Regularly clean the following parts:
- Lens covers: Use a soft cloth and a gentle cleaner to remove dirt without scratching.
- Reflectors: Ensure they are free of debris to enhance light reflection.
- Wiring: Keep wiring clean and free from obstructions to prevent electrical issues.
Upgrading to Energy-Efficient Options
Consider upgrading to energy-efficient lighting options like LED bulbs. These not only provide brighter illumination but also consume less power, leading to improved battery life. Look for LED bulbs specifically designed for golf carts, which typically cost around $20 to $50 per set.
Checking Battery and Electrical Connections
A well-functioning battery is vital for your lighting system. Regularly check the following:
- Battery terminals: Ensure they are clean and securely connected.
- Voltage levels: Use a multimeter to monitor battery health, aiming for a voltage of around 12.6 volts when fully charged.

Seasonal Maintenance Tips
Different seasons can affect your golf cart's lighting system. Here are some tips to consider:
- Winter: Store your cart in a dry place to avoid moisture build-up, which can lead to corrosion.
- Summer: Protect lights from excessive heat by parking in shaded areas or using covers.
By following these maintenance practices, you can ensure that your golf cart's lighting system remains effective and reliable, contributing to both safety and enjoyment on the course.
We would love to hear your thoughts and insights on Golf Cart Lighting System Upgrades! Whether you have questions, personal experiences, or tips to share, your contributions can greatly enrich our conversation. Please feel free to drop your comments below; your voice matters and can help fellow enthusiasts make informed decisions. Thank you for being a part of our community!
Leave a Reply