
In this article, you will discover a comprehensive overview of golf vehicle steering linkage replacement, providing detailed, step-by-step instructions to ensure a successful repair. The guide covers essential tools, safety tips, and troubleshooting advice to help you navigate the process of golf cart steering rod substitution effectively. Whether you're a seasoned mechanic or a DIY enthusiast, this resource will equip you with the knowledge needed for efficient golf cart tie rod swap.
Understanding the Importance of Golf Cart Tie Rods
Golf cart tie rods play a crucial role in ensuring the smooth operation and safety of your vehicle. These components are essential for steering control, directly affecting how well your golf cart responds to driver input. Recognizing their importance can lead to better maintenance practices and enhanced performance.
What Are Golf Cart Tie Rods?
Golf cart tie rods are part of the steering mechanism, connecting the steering rack to the wheels. They facilitate the transfer of movement, allowing the driver to navigate turns and obstacles effectively. A well-functioning tie rod ensures that your golf cart handles smoothly and predictably.
Why Tie Rods Matter
The significance of tie rods in golf carts can be highlighted through several key points:
- Steering Precision: Properly functioning tie rods provide accurate steering, allowing for precise control over direction.
- Vehicle Stability: They contribute to the overall stability of the golf cart, especially during sharp turns or uneven terrain.
- Tire Longevity: Worn or damaged tie rods can lead to uneven tire wear, necessitating more frequent replacements and increasing maintenance costs.
- Safety: Faulty tie rods can cause steering failure, posing serious risks while driving. Regular inspections can prevent such hazardous situations.
Signs of Tie Rod Issues
Being aware of the signs that indicate tie rod problems can help you address issues before they escalate. Look for:
- Loose Steering: If the steering feels loose or unresponsive, it may indicate worn tie rods.
- Uneven Tire Wear: Check for uneven wear patterns on your tires, which can signal misalignment caused by faulty tie rods.
- Unusual Noises: Listen for clunking or rattling sounds while steering, suggesting potential tie rod damage.
Maintaining Your Tie Rods
Regular maintenance of golf cart tie rods can significantly extend their lifespan. Consider these tips:
- Routine Inspections: Regularly check tie rods for signs of wear or damage.
- Proper Alignment: Ensure that your golf cart is properly aligned to reduce stress on the tie rods.
- Replacement Timing: If you notice any signs of wear, replace the tie rods promptly to maintain optimal performance.
By understanding the critical role that tie rods play in your golf cart's functionality, you can take proactive steps to ensure your vehicle remains safe and efficient. Regular attention to these components can lead to a more enjoyable and worry-free golfing experience.
Signs That Indicate a Need for Tie Rod Replacement in Golf Carts
Recognizing the signs that your golf cart's tie rods may need replacement is essential for maintaining optimal steering performance and safety. Here are key indicators to watch for:
1. Steering Wheel Play
If you notice an unusual amount of play in your steering wheel, it could be a sign of worn tie rods. When the tie rods are compromised, you may find that the steering wheel turns more than expected before the wheels respond. This can lead to unpredictable handling and should not be ignored.
2. Uneven Tire Wear
Inspect your golf cart’s tires regularly. If you observe uneven wear patterns, such as excessive wear on the inner or outer edges of the tires, it might indicate that the tie rods are not holding the wheels in proper alignment. This misalignment can lead to further damage and should prompt an evaluation of the tie rod condition.
3. Clunking Noises
Listen for clunking or knocking sounds when you turn the steering wheel or go over bumps. These noises can signal that the tie rods are loose or damaged, allowing excessive movement that results in noise. Addressing this issue promptly can prevent more serious damage.
4. Steering Difficulty
If you find it increasingly difficult to steer your golf cart, it may be a result of failing tie rods. A stiff or unresponsive steering system can indicate that the tie rods are not functioning correctly, impacting your overall driving experience.
5. Visual Inspection
Conduct a thorough visual inspection of the tie rods. Look for signs of rust, corrosion, or physical damage such as bends or breaks. Any visible defects can compromise the integrity of the tie rods and signal a need for immediate replacement.
6. Alignment Issues
If your golf cart pulls to one side while driving, this misalignment can often be traced back to faulty tie rods. Regular alignment checks can help identify this problem early, allowing for timely intervention and potentially saving on more extensive repairs.
Regular Maintenance for Longevity
To prolong the life of your tie rods and enhance your golf cart's performance, consider incorporating regular maintenance checks into your routine. Keeping your golf cart in optimal condition can prevent premature wear and ensure a smoother ride.
By being vigilant about these signs, you can effectively address any issues related to tie rod performance in your golf cart, contributing to a safer and more enjoyable golfing experience.
Step-by-Step Guide to Replacing Golf Cart Tie Rods
Replacing the tie rods on your golf cart is a crucial maintenance task that ensures optimal steering performance and safety. This guide provides detailed, actionable steps to help you replace your golf cart tie rods effectively.
Tools and Materials Needed
Before you begin, gather the following tools and materials to ensure a smooth replacement process:
- Socket Wrench Set – For removing bolts.
- Torque Wrench – To ensure proper tightening of bolts.
- Replacement Tie Rods – Make sure they are compatible with your golf cart model.
- Grease Gun – To lubricate the new tie rods.
- Jack and Jack Stands – For safely lifting the cart.
- Safety Glasses – To protect your eyes during the process.
Step 1: Safety First
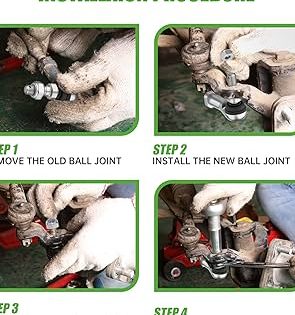
Always prioritize safety. Park your golf cart on a flat surface and engage the parking brake. Use the jack to lift the front of the cart and place it securely on jack stands.
Step 2: Remove the Old Tie Rods
1. Locate the Tie Rods: Find the tie rods connected to the steering knuckles and the steering gear.
2. Disconnect the Tie Rod Ends: Use the socket wrench to remove the nuts securing the tie rod ends. Gently tap the side of the steering knuckle to free the tie rod if necessary.
3. Remove the Tie Rod Assembly: Unscrew any additional bolts or clamps holding the tie rod in place, then carefully take out the entire assembly.
Step 3: Install the New Tie Rods
1. Position the New Tie Rods: Align the new tie rods in the same position as the old ones. Ensure that the length is identical to maintain proper steering geometry.
2. Secure the Tie Rod Ends: Attach the new tie rod ends to the steering knuckles and tighten the nuts using the socket wrench. Make sure they are secure but do not overtighten.
3. Reattach Any Additional Components: If you removed any other components, such as clamps or brackets, reattach them as needed.
Step 4: Lubrication
After installation, use the grease gun to lubricate the tie rod ends. This will help reduce friction and wear, ensuring a longer lifespan for your new tie rods.
Step 5: Check Alignment
After replacing the tie rods, it's essential to check the alignment of your golf cart. Misalignment can lead to uneven tire wear and steering issues. It’s advisable to take your cart to a professional for an alignment check if you’re unsure.
Step 6: Final Inspection
Once everything is reassembled, lower the cart from the jack stands. Conduct a thorough inspection of the installation, ensuring all bolts are tight and that the tie rods are properly secured. Take your golf cart for a short test drive to ensure the steering is smooth and responsive.
By following this step-by-step guide for replacing golf cart tie rods, you can enhance the performance and safety of your vehicle. Regular maintenance of these components is key to enjoying a smooth ride on the golf course.
Choosing the Right Replacement Tie Rods for Your Golf Cart
When it comes to maintaining the steering system of your golf cart, selecting the appropriate replacement tie rods is crucial for ensuring safety and optimal performance. Understanding the specific requirements for your vehicle can help you make an informed decision. Here are some essential factors to consider when choosing tie rods for your golf cart.
Compatibility with Your Golf Cart Model
Every golf cart model has unique specifications. Before purchasing tie rods, it’s important to verify compatibility with your specific model. Most manufacturers provide detailed guidelines regarding which parts fit their vehicles. Here are some common brands to check:
- E-Z-GO - Ensure the tie rods match the year and model, as dimensions can vary.
- Club Car - Look for OEM (Original Equipment Manufacturer) parts for guaranteed fit.
- Yamaha - Review the part numbers in your owner's manual for accuracy.
Material Quality
The material used in tie rods affects their durability and performance. Look for options made from high-strength steel or heavy-duty aluminum, as these materials can withstand the rigors of daily use. Here are some features to consider:
- Corrosion Resistance - Choose tie rods with protective coatings to prevent rust.
- Weight - Lightweight materials can enhance performance without sacrificing strength.
- Flexibility - Some materials offer better flexibility, reducing the risk of breakage during rough terrain driving.
Length and Adjustability
The length of the tie rods is critical for proper alignment and steering response. Measure the existing tie rods or consult your golf cart’s service manual for the correct specifications. Adjustable tie rods can provide a custom fit, allowing for minor tweaks in alignment to improve handling.
Aftermarket vs. OEM Tie Rods
Deciding between aftermarket and OEM tie rods can impact both performance and cost. Here’s a quick comparison:
- OEM Tie Rods - Typically more expensive but guarantee compatibility and quality.
- Aftermarket Tie Rods - Often more affordable, but ensure they meet the necessary specifications for safety and performance.
Installation Considerations
Proper installation is key to maximizing the lifespan of your tie rods. If you are not experienced with golf cart repairs, consider hiring a professional to ensure correct installation. If you choose to DIY, follow the guidelines in the Essential Guide to Golf Cart Tie Rod Replacement: Step-by-Step Instructions to ensure accuracy.
By focusing on these aspects, you can confidently select the right replacement tie rods that will enhance the safety and functionality of your golf cart.
Common Mistakes to Avoid During Golf Cart Tie Rod Replacement
When undertaking the task of replacing the tie rods on your golf cart, it is essential to be aware of potential pitfalls that can lead to complications or safety issues. This guide outlines specific mistakes to avoid, ensuring a smoother and more efficient replacement process.
1. Neglecting Proper Tools
Using the right tools is crucial for a successful tie rod replacement. Many DIY enthusiasts make the mistake of using inappropriate tools, which can lead to stripped bolts or damaged components. Ensure you have the following tools on hand:
- Socket set: A comprehensive socket set will help you easily remove and install tie rods.
- Torque wrench: This ensures that you apply the correct amount of force when tightening the tie rod ends.
- Ball joint separator: Useful for detaching tie rods from the steering knuckle without causing damage.
2. Ignoring Alignment Issues
After replacing the tie rods, many forget to check the alignment of the wheels. Misalignment can lead to uneven tire wear and affect the handling of the golf cart. Always perform a wheel alignment check after the replacement to ensure everything is set correctly.
Steps for Checking Alignment:
- Inspect the front tires for even wear.
- Measure the distance between the front and rear of the tires on both sides.
- Adjust the tie rods as necessary to achieve proper alignment.
It’s easy to focus solely on the tie rods, but related components such as the steering rack and ball joints should also be inspected. Failure to check these parts can lead to premature wear or failure shortly after the replacement.
Key Components to Inspect:
- Ball joints: Look for signs of wear or play.
- Steering rack: Ensure there are no leaks or damage.
- Linkage: Check for any signs of rust or corrosion.
4. Skipping Safety Precautions
Safety should always be a priority during maintenance tasks. Some individuals may rush through the replacement process without taking necessary precautions. Always:
- Use jack stands to support the golf cart safely.
- Wear safety goggles to protect your eyes from debris.
- Ensure the cart is on a flat, stable surface.

5. Failing to Document the Process
Many overlook the importance of documenting their work, which can lead to confusion later on. Keeping track of the steps taken, torque specifications, and any issues encountered can be invaluable for future maintenance or repairs.
By avoiding these common mistakes, you can ensure a more successful golf cart tie rod replacement process, ultimately enhancing the performance and safety of your vehicle.
We’d love to hear your thoughts and questions about Golf Cart Tie Rod Replacement! Your insights and inquiries not only enrich our community but also help others who may be navigating similar challenges. Whether you have personal experiences to share or seek clarification on specific aspects, please feel free to leave your comments below. Together, we can enhance our understanding and support one another in making informed decisions.
Leave a Reply